Since this is actually the second time I experimented with these things I'm giving them versions (actually not, I just needed a title for this blog entry). The first version kinda worked, but ran into problems...
 |
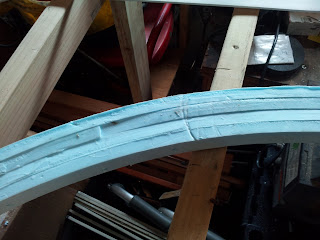
| Original Spline Kittanning Curve, February 2012 |
The slope is cut into the spline and glued to the flat foam table top. It worked pretty well but the grade wasn't smooth. There were high and low spots that caused stalling and such. I found it was nigh on impossible to correct these issues, so I trashed the idea. I did, however, learn one thing. Once the glue as cured the spline retains it's shape. Here is Kittanning Curve laying out on the front lawn...
 |
| Ignoble End to First Generation Spline, September 2012 |
Version 2 works but the guys over at
Railwire saw a few obvious issues I hadn't noticed. Happens all the time, I can't see the forest for the trees until weeks (or longer) have past. So I took their observations and advice and came up with version 2.1...
 |
| Styrospline 2.1 |
I combined two ideas to come up with this. A long while back I tried to create splines using wooden blocks and lattice strips. The lattice strips where made from hardened extruded styrofoam (sense a pattern here?). It took forever to lay up a spline. First off I had to cut 1" long wood blocks out of 1"x 1" hardwood. Then I had to curve one lattice strip and glue and clamp the blocks to it. When the glue had dried I added the second lattice strip. Since I was building four track roadbed this went on for quite a while. That was just for the first curve! I have a photo of the only curve I built laying around here somewhere.
Anyway, The idea came back to me after luan strips were mentioned in the Railwire thread. I stopped off at Lowes and picked up two 8' lengths. I used the same section of roadbed I had used before at McGarveys and clamped the lattice strips to either side of the roadbed...Incidently I had stated earlier that this section was only two splines thick. I was incorrect. I hadn't looked. It was actually a four spline lamination (and a rough one at that)...
 |
| 4 Spline Roadbed at McGarveys |
Be that as it may, I clamped the splines to the roadbed and then clamped the roadbed to the frames work. Everything was fastened down the way it would be on the finished layout.
 |
Secured in Place with Clamps
|
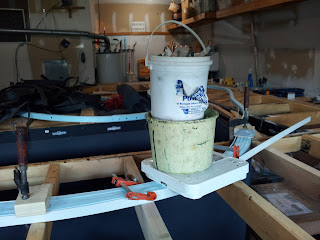
I then weighed one very heavy bucket of bolts and stacked another on top to get over 40 pounds. I then grabbed the entire stack, including the scale, and set it down on the roadbed...
 |
| 40 Pounds!!! |
As far is I can tell there is no deflection. The lattice strips flop all over the place horizontally, but won't bend vertically. If you apply enough force to bend them that way they will just snap. It takes quite a bit to snap them. Laminated with the blue foam results in two things...The lattice reinforces the blue foam and the blue foam keeps the lattice from curling horizontally...
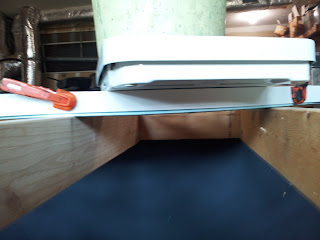 |
| No Deflection Locally |
Not only does the section between supports seem to hold up the the stress, but the rest of the spline looks much the same...
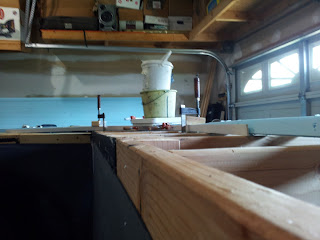 |
| No Deflection in General |
With all the roadbed reinforced like this the entire length should be stronger. To guarantee this I'm going to stagger the joints. Each spline will be offset half a length from the previous, including the "hard spline".
The cross section of the spline widens dimensionally. Each hardspline is an 1/8" thick. This is only a 1/4" on a two track spline set. This will set a sort of standard for the other variants of the roadbed...
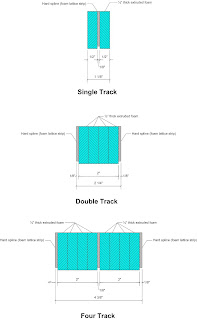 |
| Spline "Combos |
The hard splines add some expense to the roadbed. One lattice strip is about $3.50. That's about $60 for 90 feet of track. Not too bad. I can buy a few strips at a time if I don't want to shell out sixty bucks at one go.
Hopefully this will work out as well as I'm hoping. We'll see.
Regards,
Frank Musick
Chief Cook and Bottle Washer
 |
| Allegheny Eastern Railroad |


No comments:
Post a Comment