Buiilding a respectable looking turnout that actually works took awhile. I had to develop the construction methods and tools. I caved in on the soldering. While I can solder wires, I have real trouble with these turnouts. Instead I built the turnout using various adhesives. I tried super glue, contact cement and a couple of others. For the most part I settled on tiny drops of the gel type super glue. It's easier to control and it allows some fiddlin time to line things up.
The turnout appears to be very conventional but there are small differences in construction. On my turnout I decided to piece the turnout together rather than build it and then cut isolating gaps in the rails. The frog rails and closure rails are separate pieces of raiL The frog point and "wing" rails that make up the frog are also separate parts, but form a subassembly that should be isolated from the rest of the turnout electrically.
Turnout Parts
I used the fixture I had made previously to hold the various parts together while I made things up. The file and a rubber band function as a clamp to keep thing together...
Assembly Fixture and Clamp
Rather than worry about angles and such I just filed by a guestimated length and then folded the rail to create the frog points. I made the points and stockrails using a double sided homemade fixture for filing...
Filing Fixture
I also made some track gauges using some small lucite levels, the kind that come as keychains. I used a razor saw ( the small ones made by Zona, Xcel or Xacto) to cut slots for the head of the rails. On one of the levels I used both sides. On one side the slots are spaced for the normal rail gauge. The other side has slots spaced for the width of the closure rails. I use that side to hold the rails while I glue up the throwbar...
Closure Rail Jig
I found I could also use the rail gauge to form the wing rails. It's easier to show then explain. Maybe you get the idea...
Forming Wingrail
While the glue on the throwbar was setting I went on with the rest of the turnout. I assembled the frog and glued it in place. The stock rails were then placed using the level/gauge to space them properly. The frog rails were then lined up with the frog and gauged to the stock rails....
Frog and Rails
I show the turnout with all the ties in place but it was actually constructed in a similar fashion to soldered turnouts. I glued ties at strategic places that would hold things together during assembly...
Sans Points
The last part of the assembly was installing the closure rails. This subassembly is actually fed up though the turnout from the bottom. I leave the long ties at the throwbar off to make room for this. Once the closure rails are through I line them up with the frog and add glue to a number of ties to fasten the rails down. I do not put any glue on the ties closest to the draw bar (about 8 ties). This part of the rail needs to be loose to allow the points to move. I then glue up the long ties on either side of the throw bar...
"Finished" Turnout
The ties, by the way, are actually plastic strip cut to length. I use .030 thick by .060 wide. I think Evergreen might be the only company that makes these. The ties on this turnout are placed by hand, I don't cut them to length ahead of time. I glue several strips to the bottom of the rail and then cut them to length. I do this five strips at at a time using the cutoff's from the previous five. One bag of strips, about $3-$4 at my LHS is enough to do one turnout.
The rail I use is from Atlas code 55 flex track. I just pull the tiestrip off of the numerous "cut-offs" I have around.
This turnout is a prototype and as such was a test bed for construction, adhesives and materials. The rest of the turnouts will be handled a bit different. Fortunately I designed the Average Eastern to use a "standard" #7 turnout. The parts for both left and right hand turnouts are the same. Any curves are formed at assembly time. Closure rails, guard rails and points can be made in batches. The longer rail can be a bit oversize and trimmed to the proper length at assembly.
I'm currently building a jig using .015 thick x .060 wide plastic strips that will allow me to layout the ties for turnouts without the tedium of gluing one at a time. I'm going to go with Pliobond for the adhesive. Pliobond can be applied to the bottom of the rail and allowed to cure ahead of time. The glue can be reactivated at assembly by heating the rail.
This exercise in futility was accomplished when the turnout building got to me. I took another shot at the tangerine and blue Jersey Central units. Although I don't have the decal thingie perfected yet, I was able to get closer to the goal. I only have the proper ink in white at present...
Pennsy HO Scale
N Scale Jersey Central
Now I have to figure out how to make orange and blue to match the diesels. Which brings me to our current adventure, masking and painting the CNJ F units. The A unit shown here is not one of them. This is a broken shell that hurtled a scale 600 feet to the hard concrete below...
Concrete and Models Don't Play Well Together
The real one is in the mail and headed this way. In the meantime I practiced on the wreck. I have two sets to paint in this color combination including an A-B set of Baldwin "babyfaces". I want to get it right.
When painting two tones like this I start with the lighter color first. Really can't be done the other way. To many coats are required to cover a dark paint with a lighter shade. I used Testors Gloss Tangerrine for this attempt. It's meant for automobile models, but this is a GM locomotive after all. Close enough. Actually the color seems very close to the real CNJ paint. It even has that ambiguous "Is it orange or yellow?" thing going just like in the photos of the actual units...
Testors Gloss Tangerine
After the first color dries, about a day, the model gets masked so the second color can be applied. On the F unit I ran the tape (Tamiya) over the side intake grilles. The tape comes down to the top of the upper riveted panel. I run it right around the cab and across the winshield opening. The front of the roof is masked so that the orange follows the angle of the windshields. After both sides and the roof are masked I start masking the nose. On these units the orange stopped at the anticlimber...
Nose Mask
The orange extended a short way to either side of the anticlimber but still on the front. The color curves up toward the cab sides. These curved portions of the painting are not as hard as they look (I know, everybody says that). There are a number of ways of masking the curve. For this project I chose the simplest. I use straight sections of tape and mimic the curve by creating a multi sided polygon instead of an actual curve. At this scale it's very easy to suggest a curved line...
"Straight" Curve
Fortunately, the real CNJ units may have been masked in a similar fashion. If you look closely you see that some of the curve is not actually curved. Gives me a fudge factor...
"Restored" CNJ F-3
The unit pictured is actually a restoration and not necessarily an actual CNJ locomotive but you get the idea.
After all the tape is applied I use my fingernail to "burnish" the edges where the colors meet. I want to seal the mask as best as I can. To ensure the lines will be crisp without paint bleed I spray the masked model with a clear overcoat. This should seal the edges of the tape and keep the paint where it belongs. A very light coat is all that's needed. I you get too happy with the airbrush you end up with this....
Thick Coat Of Clear
Although the paint won't be seen when it dries it will hide the detail of the model. Not a good thing as it will show up in the next color, only more so...
Too Much Paint
If it ends up like this the best thing is to strip the shell of all paint and start over, something I'm not gonna do on this broken shell. After the clear coat dries, I spray on the darker color. Make sure you get get all the sreas that are supposed to be blue. I missed the lower skirt on one side and had to shoot a layer of blue there.
After the blue dried I peeled off all the tape...
CNJ #57
The lighter color looks a lot better this time around, not the ORANGE of previous attempts...
Previously On Milepost 15...
The blue I used on the latest attempt is Model Master royal blue. It's probably too light. I'll probably use the Blue Angel blue I used on the first go'round. I personally don't like the way the curve came out. I did better on the earlier paint job.
If I can make those matching decals I should be all set.
The fun continues. I had a bit of money from birthday gifts and started looking for more Atlas turnouts. As it turns out there aren't many code 55 switches on E-Bay. While I was looking, however, it ocurred to me that I could probably afford one of those FastTracks turnout fixtures. As I remembered they were about $50 the last time I looked (years ago). Surfed to their site and WHAM!. The N scale fixtures are no longer in stock. Apparently they only make them when somebody orders one. This is probably not a frequent event as they now charge $218 dollars for said product.
Hmmm. Went looking for used ones on EBay...Negatory. I did find a rather intreresting thread about the jigs, including one about the fact that folks who buy the fixtures stop using them after a while. Seems as though they are like training wheels. You store them in the garage or sell 'em once you learn to ride the bike. There was also a fellow who stated he doesn't use them because he found another way. For him the hardest part was making the frog. He gave a link to a site that shows a pretty nifty solution. If you go to Model Railroader you can look at it yourself...Incidently the site is NOT a Kalmbach site, which gave me a chuckle.
Anyway, I tried it and it works...You set the bend as suggested and file it until it can be folded...
Filed Frog Point
I found that it worked better if I filed a bit more...wider, not deeper. By "overfiling" I found I had some fudge room on the angle. The rails can be brought closer together creating a shallower angle.
Once started with the frog point I had to continue. I wanted to see if making turnouts really isn't "rocket science". Well it isn't, sorta. You do need a certain skill set, apparently one which I don't have quite yet, like soldering. I used one of those printable templates from the FastTracks site and built the urnout on top of it...
Using Printable Template
I cut the PC board ties from a large PC blank I bought at Radio Shack years ago when I had attempted this once before. I tinned the bottom of the rail and used flux and other solder related references. The end result was something only Victor Frankenstein could love...
Frankenstein's Turnout
Nonplussed I decided I WILL learn to do this. Instead of starting with with the frog, I began with the switch points. I grabbed a couple of pieces of rail and went to work. First I made a tool. I took a piece of wood about a half inch square and six inches or so long. It's not very big, but it doesn't have to be...
Point Stick
On one side I cut a slot with a razor saw. The slot is just big enough to accept the "toe" of the rail base...
Point Filing Jig
I also made some markings to show me where to file. The short spaced area is the area where the point will contact the stock rail...
Point Side
I flipped the stick over and cut another slot. This side is for filing the stock rails. The markings are the length of the inset for the points to rest against...
Stock Rail Side
I used a bastard file to shape the rail. I thought of using my Dremel, even tried it out. It's faster, but hand filing is just as fast but with better control. A bit of filing and I had points and stock rails in hand. Then I used the method mentioned above to make the frog point.
About this time I realized those FastTracks fixtures must be really helpful when trying to assemble the various parts. Rather then spend the $200+ I made my own. It's crude, but it seems to work. I took a chunk of hardwood I had laying around and cut some grooves in it using my "Jap" saw (a razor saw used by Japanese woodworkers). The slots are just big enough for the head of the rail, the turnouts are assembled upside down...
Railhead Slots
I copied the FastTracks fixture and made right hand and left handed jigs on the same block of wood. The curved slots were made with the same saw. The blade is quite flexible and can be used for cuts like these...
Turnout Assemble Fixture
There are slots to hold the points, frog, stock rails and wing rails. I can assemble the switch, but more importantly I can see where the points will rest in relation to the stock rails and what has to be done to make the wing rails fit the frog. It's pretty obvious where the point rails need to be bent to match. I tried soldering the PC ties on again and although it came out better this time I still can't solder any better than I can weld (you don't wanna know). At least some of the solder joints stayed together...
FAIL!!!
I'll keep at it. Can't possibly be as hard as it looks.
After the realization that my Atlas turnouts require power to the frog I started looking around for ways to do so. I found several methods. The first uses a relay off the switch motor. Don't want to buy 40 switch motors. Besides, all the turnouts on the Average Eastern are within aisle range and will be manual throw. A similar solution is the "frog juicer". Although it sounds like some sort of exotic food processor it is actually a device that powers the frog. It switches polarity by sensing shorts. Neat bit of electronics but I'm not crazy about the "short" part. They also cost about $20 a throw. Once again price becomes an issue.
So I sit down and try to design a switch control similar to the Caboose Industries ground throw. If built to conduct electricity it could move the points and power the frog. The position of the switch would dictate the polarity. The idea has already been thought out by others and I fell across a solution on Railwire (where else). Using an electrical slide switch as a turnout throw solves the problem. According to Dave Vollmer the switch can be found at Radio Shack. Look for Radio Shack 275-0409 Submini SPDT.
I've begun "mocking up" decals so I can check how they will look when applied. One of the major issues with printing my own decals is the size of the lettering I use. The very smallest letters are 1pt and simply too small to reproduce on a silk screen. Rather than waste emulsion, transparencies and printer ink I print out black and white copies and glue them in place on the car...
Decal Mock Up
The lettering in the image is about the right size, larger is too big. Smaller doesn't work for some many reasons. Based on these results I've been revising the masters in Visio. Each sheet is 4' x 5' for a specific railroad and car...
Typical Decal Sheet
Although the bulk of the sheet is boxcars, I did sneak a couple of cabeese in. So far I've put together sheets for NYO&W, L&HR, DL&W and the other roads I plan to model. The Average Eastern is included of course, but since the AE has few pieces of rolling stock of its own I added a set of Allegheny Eastern boxcars. The All East and the Lehigh & Atlantic were two of my earlier efforts at layout building. They are also included on a sheet for other model railroads...
Model Railroad Decals
I'm thinking it would be kinda neat to have at least one boxcar from each of the layouts I consider inspiration. I intend to add more as I remember. Some of the roads from the NMRA Heritage sets should also appear here. Guys like Bill McClanahan, George Armstrong and Bob Hegge are all on my list of modeling hero's.
Finallly, based on a request from a subscriber on YouTube I tried to create a new set of videos with better resolution. I learned a trick or two recording my grandson's soccer match and tried to apply them. There is still lots of room for improvement, but I'm getting better at it. Wish I had more equipment to run, but most of it is in the shops...
On the wall of the computer room where I used to work there was a rather large sign displaying the letters RTDM. I imagine there are quite a few such rooms with the same sign. There should be one on every workbench, including mine.
Okay....so I bought one of those Bachmann Consolidations. You know the Spectrum ones like the image at the top of this blog. Beautiful model, probably the most detailed piece of motive power on the roster. Actually the only piece if you only count the actual Average Eastern equipment. Anyway...Not only does it look great it also runs perfect. Great low speed response..all that sort of thing.
In building the yard at Average I used Atlas turnouts I had on hand. I was able to install most of the trackage in the yard proper. So I put the 2-8-0 on it's home rails and put the little critter through its paces. Ran exactly like it should until...
Apparently the little gem does not like my Atlas turnouts. At low speed, crawl that is, it stops dead at every turnout. The only way to get it through the yard non-stop is open her up and whiz through the turnouts at rather unprotypical speeds. Hit a freightcar at those speeds and you end up watching it launch off the end of the layout.
One of the videos I made shows the 0-5-0 giving the little Connie repeated assistance as it makes its way through Average yard...
I did a search on the web for "n scale bachmann spectrum 2-8-0 and atlas code 55 turnouts" to see if anyone else has encountered this problem. Didn't really find anything useful. On most locomotives this could be a symptom of poor electrical pickup. Many of the older Trix engines don't use tender pickup and stall in the same manner. The Bachmann, however, has locomotive and tender pickup...
Bachmann Tender
I changed my search parameters to "atlas code 55 turnout stall" and found several discussions including this...
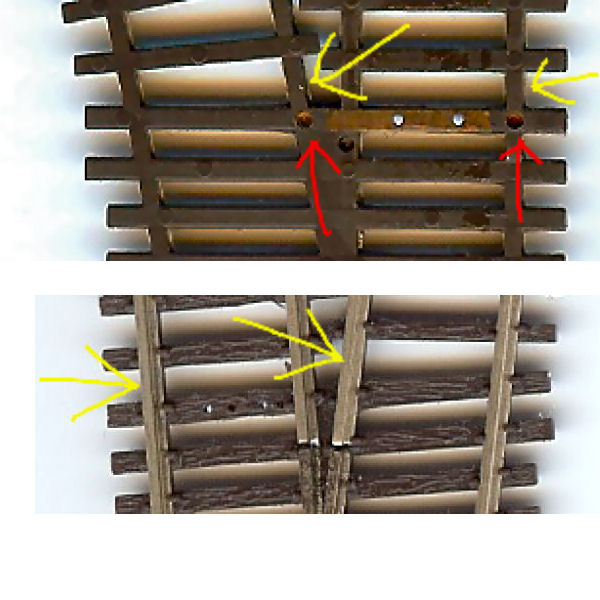
"This problem is caused by failure of the built in jumpers on the turnouts. If you look at the photo you can see a small copper strip that acts as a jumper between the rails. It is molded into the ties and makes contact with the bottom of the rails at the small holes shown by the red arrows. There are also two similar but shorter sets of these that connect the point rails. These can lose contact with the bottom of the rail. In many cases, but certainly not all, this seems to be caused by shorts from derailments. The contact area made by this jumper appears to get hot when this happens and breaks the connection with the rail. It’s possible that corrosion, or expansion and contraction can also cause this. Getting a replacement from Paul is certainly a prime option, but if you don't want to rip up part of your layout and wait for a replacement, it is relatively easy to repair, and in most cases can be done with the turnout in place, although a bit of ballast and roadbed needs to be excavated. You just need to feed a small jumper wire under the track and solder it to the outside of the rails where the yellow arrows show. If the jumpers to the points fail (they are located at the hinges) they can be repaired in the same manner. Incidently, I have seen this in other scales over the years, it is not isolated to Atlas code 55."
Now that's all well and good, but what has it to do with the issue at Average? While my turnouts are similar the problem is not with the points. In my case the locomotive seems to stall at the frog. Still the info gave a place to start. I decided to check my turnouts.
Fortunately for me I don't fasten the track down permanently, at least not until I want to. It's all held down with track nails.I tried gluing it down, but this doesn't work for my method of tracklaying. I like to be able to tweak the track in case there are issues, like turnouts that stall locomotives. Thus I was able to pull the turnouts up without issue and check them over. I got out my trusty multimeter and did some tests.
First I fliipped several of the beasties over and tested the "jumpers" shown in the images above. None of mine were "burned". They were all intact and doing what they ought to...
Jumpers
With electrical devices a visual check isn't quite good enough. You can't see the flow of electricity, hence the multimeter. A particularly useful function of said apparatus is the continuity test. You can check a circuit to see if it actually conducts electricity without having it powered up. I used the probes to see where the electricity went, or more importantly, where it didn't. To check for continuity you set the meter to measure ohms or Ω. If you probe a circuit and the display changes from 1 to anything else there is a path for the current. This tells you A..a circuit is working or B.. there is a path that should not be there, as in the case of a short circuit. So I use the probes to see if the jumpers are actually jumping...
Probing Jumper
The meter display changes so I know that jumper is working...
Continuous Circuit
I tested all the jumpers underneath the track and everything looked okay. Then I flipped the turnout upright. Because they are metal, the frogs on these turnouts are insulated from the rails. That means the frog is electrically dead and carries no current...
Insulated Frog
I used the meter to make sure. No path between the frog and any other rail in the turnout. Hold on a minute...there is a small "ring" at the end of the jumper. Hmmm...I test the continuity between this ring and the frog. This is one of those "Ah Ha" moments...
Ah Ha!
Maybe I should say "DUHHH" moments...So the issue is the frog. The locomotive gets to that part of the turnout and stalls because there is no power. The "ring" is a terminal to power the frog. At this point I should quote another message I found...
"If this is one of the Atlas turnouts with a cast metal frog insulated from the rest of the turnout, there are two possibilities. One is that the frog is slightly higher than the adjacent rails. When it lifts the wheels in the rigid frame of a small steam engine, they lose contact with the live rails and are only contacting the dead frog. The easy way to fix that is to use a small mill file to make the frog level with the adjacent rails.
Once the frog is level you may still have troubles just because the frog is dead. If you use switch machines you can power the frog through auxiliary switching contacts on the switch machine. If you use ground throws or some other manual operation, you can power the frog through a Tam Valley Depot Frog Juicer circuit. This requires connecting three wires, one to the frog and one to each turnout stock rail. The Frog Juicer then powers the frog and automatically switches polarity when it detects a short circuit. It's all electronic, and no mechanical switching is necessary."
I'm pretty sure there is information from Atlas detailing this exact situation. Maybe I should have followed the advice of the big sign, the one that reads RTDM.
Going forward it looks like I'm going to start working on the Average end of the layout. Didn't necessarily plan it that way, it just kinda happened. Today I found myself laying track for the yard and engine facilities. This small yard is a lot more believable than Juniata Yard on the previous version of the layout...
Average
The track is being laid directly on the foam slab without ballast strip. I also let the track follow the topography. It's basically flat in this area, but not absolutely. The layer of paper towels/drywall compound leaves an uneven surface. The track will eventually be buried in cinders. The idea is to recreate the rough appearance found in many railroad yards.
While I had thought of not using one, I decided to keep the turnatable shown on the plan. The turntable is kinda useless. Since there no way to turn engines anywhere else on the line, there really isn't any reason to turn them here. I'm imagining that there was some other place to turn locomotives some time in the past when the AE extended past East End. Today motive power runs backward from East End and the turntable's only purpose is access to the three enginehouse stalls...
Future Engine Facilities
I had plans to build my own turnouts, but for now I'm using Atlas #7 switches I have on hand. Most of them are left hand. The plan calls for more right handed turnouts. I'm checking E-Bay to see if I get a few deals...
Average Yard Looking East
Average Yard Looking West
The test trains on the four track are now "real" trains with consists and cabeese. Had to sort through a host of cars finding ones that would run for hours without derailing. There is passenger train made up of a hodgepodge of different road names and pulled by an Erie E7. There's a Lackawanna freight behind a Geep. There were two Pennsy freights pulled by steamers but the 2-10-0 doesn't run as well as I would like. It was replaced by an A-B set wearing Erie Lackawanna livery. Took more videos with the cell phone. Hopefully you'll understand why I absolutely had to have a four track section of mainline on the Average Eastern. Growing up along the Northeast Corridor gives you a taste for big time railroading.
Precarious perched on the side of Clark's Summit our intrepid cameraman records the drama in the valley below...
Standing on the south bank of the Split, recording the parade through Clark's Summit curve...
Short video taken trackside at the east end of the curve...
Finally, a giant railfan watches from the depths of the Split River...