Sunday, January 27, 2013

Try, Try, Try Again

There is a W.C. Fields quote above my desk, "If a t first you don't succeed, try, try, try again. Then give up. There's no use in being a damn fool about it.".

I'm not at the giving up stage yet. While the work on the helix proceeds (slowly but surely) I've been working on new projects and redoing others. On the layout, I'm redoing the eastern approach to Kittanning Curve...
Eastern Approach to The Curve
What It Supposed To Look  Like


I cut out the area in question and I'm figuring out how to reverse that curve. I can't just flip the roadbed. The location and/or radius of the curves at either end will need to be changed.

While working on the helix I found that soldering the track into long straight sections before curving it doesn't work for me. At least it doesn't inside the helix. The "sliding" rail moves so far that I have to cut way too many ties out. This results in a large gap in the tie strip leaving the rails unsupported and possibly out of guage. Instead I started leaving the very end of the preceding track section loose so I could attach the next section as a tangent. After soldering the rail joints I can curve the track without the joint and joiner on the inside rail moving too far out of place...
"Tangent" Joint

It's a bit slower, but I'm getting better results.

Some of the code 80 flex track is older Rapido which is chemically blackened. I find I have to file the rail to expose the nickel silver to make a good solder joint.

Clean The Ends of Rapido Flex Track
There may be a way to chemically remove the black but I haven't really looked.

Among the side projects is a model of a one of a kind N5e cabin car...
PRR Class N5e Cabin Car
I have an brass kit for an N5c that I decided not to build after buying one of the Bowser models. I was pretty sure my best efforts with that kit would not look as good as the factory product. It languished in a drawer until I came across this photo. I decided I would use the kit as a basis for an N5e.

Didn't work out to well...
N Scale N5e
I used a metal underframe, trucks and end platforms from a MTL Great Northern caboose. I had to "section" the frame to fit the new body, making it about 1/4" shorter. It occurred to me that I might use a Bachmann "Northestern" caboose model, but couldn't find a cheap one. 
Bachmann "Northeast" Caboose

I went ahead with the brass parts from the kit. Unfortunately I don't see the "frankensteiness" of the models until I look at the photos. My eyes can no longer see that well. Yuck, what a mess! I took it back to the workbench (kitchen table) and took it apart. After removing the paint and such, I decided I was better off redoing the thing from scratch. The Bachmann caboose is still a good candidate, but I'm trying to build up the N5e from sheet styrene.

I also went back over two locomotives I wasn't happy about. Both the R2 and the L1s I was working on last week just weren't right. On the R2, I took it apart and tried to refine it. I filled in more joints and shaved off more details. I went over the tender and tried smoothing the joints...
Reworked R2
Coast to Coast Tender


I'm not sure I'm happy with either one yet, but I'm getting there.

I also took the L1s I had assembled and cleaned and filled all the holes before repainting it. Still haven't added any details. Getting it running will require a lot of handling and those fine details won't survive...
Reworked L1s
The model could have been done better, but the pewter parts won't take another redo.

I keep trying. I just hope I have the sense to know when to quit.

Regards,
Frank Musick
Chief Cook and Bottle Washer
Allegheny Eastern Railroad


Monday, January 21, 2013

On a Binge

This must have been the weekend for it. I started on some of the projects I've had on the back burner and couldn't stop. Went into a motive power frenzy, including yet another run at the phantom R2. It just didn't look like a J1a or a Pennsy locomotive in general. I rebuilt the cab and took a shot at building a "coast to coast" tender. It's nowhere near an exact replica of a J1, but I'm hoping it leaves a similar impression...
Alleghany Eastern Class R2
Allegheny Eastern Class R2


The locomotive is built from a trio of Bachmann Northern shells cut and spliced back together. The cab is a combination of the cabs from the same models, although the cab sides are made from styrene. The cast pilot is Bachmann pilot covered in Squadron Green putty sanded to shape. Some of the details, like the tanks under the running boards were cut from scrap. The long distance tender is a combination of USRA and Pennsy tenders with a few pieces of styrene. Currently the trucks don't swivel, there isn't any room between the skirts. I'm not sure how I'm going to solve that yet.

I also got some major work done on two sets of first generation diesels. I was using an E-8 as a stand-in for one A unit in my EP3 set (A-B-A EMD E-7 units). I had an extra E-7 B unit so I spliced the two together to make an E-7 A unit. I could have tried to purchase and E-7 shell, but I couldn't find one. Besides, why spend money when the parts are on hand...
Allegheny Eastern Class EP3


The final project for this go-round was a pair of Fairbanks-Morse H-15-44 road switchers. I purchased the shells on EBay. They were part of a set that included Baldwin RF-16 "shark" shells. I mounted the FM shells on RS-3 mechanisms. I used a Dremel with a cutoff disc to remove some of the frame to allow the mechs to fit in the shells. Like every other locomotive on the All East they were sent to the paint shop for a coat or two of DGLE...
Allegheny Eastern Class FF15

I'm hoping this fever has passed and I can get back to work on the helix and the rest of the layout. The locomotives need details and couplers and other things, but that will come over time. 

With any luck the next blog entry will be "Finished Helix"

Regards,
Frank Musick
Chief Cook and Bottle Washer
Allegheny Eastern  Railroad

Sunday, January 20, 2013

Dragging My Feet

It has occurred to me that I've been dragging my feet on layout work. I find other things to do, like laundry, running the vacuum or, like this week, working on other model railroad projects. This is odd to me. I'm presently working on the helix and the new version is much less aggravation than the past attempts. The more accurate machining results in parts practically dropping into place with minimal hassle.

Maybe it's normal. Maybe a lot of model railroaders "switch off" to other tasks, other areas of the hobby. I know John Allen would do this to some extent. He sometimes built areas of the Gorre & Daphetid complete with roadbed and surrounding scenery and lay the track later. Considering all the track on the G&D was hand laid, I can understand. On the Allegheny Eastern, however, the tasks are not so tedious. Still I can't help thinking I'm avoiding something.

Maybe avoiding isn't the right word. Maybe "waiting" works better. Perhaps I am waiting for another stroke of serendipity to hit. This happens a lot. I sit on something for awhile and a new idea of how to do it comes along. Sometimes it's a solution to a vexing problem that I haven't found a fix for. Sometimes, like now, I just seem to be avoiding the question.

I know over the past week or so I've been working on projects that have been lying dormant for years. The GHQ L1s kit is one. I got mine "cheap" on EBay for $80. I paid about $60 for a Kato 2-8-2 at a show.
Pennsylvania Railroad L1s Mikado

This past week I found myself getting the box out again, but this time I didn't just read the instructions. I actually took the Kato 2-8-2 and started to modify it. It was going fine until I pulled a running board too far and the cylinder assembly came apart. All of a sudden I had a loose conglomeration of cross rods and valve gear. It took a great deal of time to get it all back together. TIP #1...Assemble the cylinder, valve rod and piston rod before you fit it to the frame. The crosshead guide should be put in place after the rest of the parts are installed. They have to fit in under the main rod so there is quite a bit of cursing and fiddling with tweezers. After an eternity I got everything back where it needed to be.

Assembling the kit was no cakewalk.Most of the parts are pewter. This means they are very soft and easily deform in all sorts of directions. Pressure of any kind will cause all kinds of fun issues. To top it off, the parts are glued together with cyanoacrylate (super glue). Too much glue and the parts will take forever to stick to each other while adhering immediately to your finger. Try to pull your finger away and whatever assembly you have completed comes apart or bends in some inconvenient manner. The cab is probably the worst part to build. Several tiny parts that must be at right angles to each other. It's probably better to assemble the cab before attaching it to the boiler but only if you use the correct parts.

Which brings us to a real problem with assembling this beauty, the instructions. No illustrations of the parts or  the procedures required to assemble them, just text. I would be helpful to know that the cab floor doesn't look like what you'd expect. Took me a LONG time to figure out that the reason it wasn't going together was because the part I chose to use as the cab floor was actually the slope sheet for the tender (sure looked like a deck plate to me). In the meantime I had succeeded in warping every single part of the cab including the curved roof. TIP #2: read articles like Max Magliaro's BEFORE you attempt to assemble this kit.

Ah the joys of model railroading. Perturbed by the problems with the cab I switched to installing the handrails of the boiler. The handrail stanchions are minute, to say the least, and etched brass. It was several tries before I learned a trick to remove each one individually with tweezers and position it in the hole I had to drill in the boiler side. Tedious is a good term to use here, especially since I drilled the holes too big. Rather the slide partway into the hole and end up looking like a stanchion, the damned thing would fall into the hole and look more like a clunky lift ring. I tried filling the first set and drilling a new set of holes but that went south on me too. I shouldn't forget to mention that by this time the brass wire used for the handrails looked like unraveled bridge cable. Trying to fit the brass wire through the eyes of aforementioned stanchions was the easiest part of the task.

Most of the detail parts are so small that I could barely see them. Even if I could see them, manipulating them with tweezers was like threading a needle with your eyes closed. Especially if your no longer blessed with steady hands. A lot of parts, including the handrails, were left off for sanity's sake.

I now have two L1s locomotives on my roster. Since they are based on Kato mechanisms they run like Swiss clocks.  Cosmetically, however, both will require some rework before I'm happy with them.
Allegheny Eastern Class L1s 2-8-2
Should have attempted to finish the helix instead.

Regards,
Frank Musick
Chief Cook and Bottle Washer
Allegheny Eastern Railroad

Saturday, January 19, 2013

A Little Madness

Over the past few days I've been perusing the book "Altoona And The Pennsylvania Railroad, Between A Roar And A Whimper" by Betty Wagner Loeb. Probably not a good thing, especially when building a model railroad based on that area of the PRR. Too many ideas being inspired by the information in its pages.
Betty Wagner Loeb's Book on Altoona

Among the illustrations in the book is a map of the Pennsy's installation in Altoona as it looked in 1929. This, of course, reminded me that I have a map from 1946. I started comparing the two and...
Altoona Yards 1946

Needless to say, I started seeing things I wanted to include in the Allegheny Eastern. Things like the flyover at HOMER where the passenger mains run under the"hump" for the westbound classification yard. The yard throat for the westbound empties yard ran past HOMER tower too. HOMER itself was unique in that it looked more like a castle turret than a interlocking tower. I started wondering how I could incorporate this scene into the layout. One thing led to another and I drew up a plan of what the layout might look like...
Allegheny Eastern "Madness"
You can see that I would need to use three sides of the layout to even make a minor effort to reproduce many of the features seen on the 1946 version of Altoona. That's something like 45 feet altogether, rather ridiculous for an N scale layout, especially one of this size. It would include the westbound receiving, classification and departure yards. The same goes for the Eastbound. Although I don't think I would even attempt a working hump at HOMER, I did include the flyover.

I still couldn't fit the 52 stall roundhouse in East Altoona or the coal yards but I did make provision for the Juniata scales, the Hormel icing plant and some cattle pens. The Altoona Northern has been reduced to a staging track. Blair Furnace is gone altogether. The Logan Valley Traction has also been cut back as well as the city of Altoona. The Allegheny Eastern would be all yard on one side and the climb to the Allegheny summit on the other. I shudder to think how much track would be required, considering the current track plan uses about 700 feet. The yards would be big enough to handle a VERY large number of trains, probably more than the "short" mainline could deal with. My "dream" layout might become my worst nightmare.

Any industrial track would have to be crammed in around the yards. Doesn't look like that would be doable except in the upper left hand corner. No peddler freights on this layout.

Might be an awesome idea if I had a lot more space and a LOT more money. Thankfully, I don't have either. The All East will have to stay as it is, at least for now. If, however, I ever hit the lottery....

Regards,
Frank Musick
Chief Cook and Bottle Washer
Allegheny Eastern Railroad


Thursday, January 17, 2013

Foobie?

Considering the Wikipedia definition, "foobie" may not be the proper word, but I have heard it used to describe anything fake, not just silicon implants. I'm more comfortable with the word "phantom" which is often used to denote a person, place or thing that never existed. A 1949 Studebaker two door station wagon, for instance, would be a phantom.

As mentioned before, the Allegheny Eastern is a freelance model railroad that follows the standards (at least some) used by the Pennsylvania Railroad. Some of the names have been changed to protect the innocent (and me) from accusations of blasphemy from my fellow Pennsy modelers.

This word "freelance", much like the word "phantom", is a clever ruse to replace realistic replicas with less real and sometimes inexpensive stand-ins. Take the Pennsy's class J1/J1a. This locomotive is one of my all time favorite Pennsylvania locomotives. There are no commercially available models and I probably could not afford one if there was. There may be brass models in N scale, but such a model would definitely be outside the operating budget.
HO Scale Brass Model, PRR Class J1 2-10-4

 Ahh...But this is not the Pennsylvania Railroad, this is the Allegheny Eastern. Unlike the Pennsy, which only concession toward the 4-8-4 wheel arrangement was the duplex T1 4-4-4-4, the All East management has no issues with the "Northern" type. There are 4-8-4 locomotives on the "Agg" and they resemble the J1/J1a class in many ways. They are classified R2, being the second such wheel arrangement on the property. The  R1 class on both the PRR and the All East was composed of a single electric locomotive.
Allegheny Eastern Class R2 (Version 3)

The R2 is actually a Bachmann Northern built from the parts of two I got pretty cheap. I wasn't sure what to do about it, thinking I might be able to use it as the basis for a 4-8-2. I'd just replace the trailing truck with one from a Trix K4 and rebuild a whole lot of other things. Then the guys at Railwire suggested that the Northern could be made into a "phantom" locomotive, a 4-8-4 that looked like a J. It had never occurred to me that a Pennsy Northern would look like anything but a T1. I liked the idea and took a shot at it. I borrowed a keystone number plate and a headlight from elsewhere. Then I remembered I had purchased a tender from a Berkshire. I filled in the pilot and the cab sides with Squadron Green putty.

I always try to take photos of my models. All of the imperfections jump out of the picture at you. I can go back to the workbench and try to correct them. On the R2, for instance, the cab has been done three times. The first cab was simply the Santa Fe cab filled in with putty and the window openings reshaped.
R2 Version 1
It didn't look right. The Jness just wasn't there. While the pilot sort of looked good, I had forgotten to paint the smokebox and firebox graphite. The cab window was also in the wrong place. So I made some changes.

R2 Version 2

The paint helped. I also made cab sides from styrene and glued them over the side panels. Things were shaping up but the cab wasn't sitting right. Try again. I straightened the cab and that did the trick. Because I had glued the new cab sides over the old cab, you can still see the old window frames. I will attempt to cut these out, but in the meantime I just painted that area the same paint I used for graphite. Some striping around the windows and some lettering will also help. While the oxide red looks great on the tender top, it doesn't on the roof. Have to paint that DGLE. The tender needs to squared off, maybe I could build a "Coast to Coast" from the Bachmann tenders. Need to add details and DCC and get her running.

I actually worked on two locomotives other the past two days. I got the drivers on my K4s to roll without hanging up. Only took about 17 tries. Then I brushed on some DGLE, red oxide and graphite. I'm still working on the motor and trying to add DCC. I had thought about filling in the pilot to make the more modern cast/welded steel version but I'm holding off. Still need to touch up the paint and add some details.

PRR and All East Class K4s
Next on the project list I have an I1s to paint and detail and a GHQ L1s kit to install on a Kato 2-8-2. Before I get into those, however, I'd better finish the helix so I can run some trains.

Regards,
Frank Musick
Chief Cook and Bottle Washer
Allegheny Eastern Railroad


Wednesday, January 16, 2013

The Other Guys

I'm thinking that many of us take the time to research the prototype and period we want to model. We look at what locomotives were used, what cars carried the freight and passengers, and what the towns and cities looked like. We consult old maps and photos to get an idea what things looked like. We look at the buildings, the trees, the rocks, even the cars and trucks in the streets. We even learn what stop signs and street lights were being used. Yet there is one area I know I haven't researched at all.

The trains that run on the Allegheny Eastern will, for the most part, be made up of cars marked for the All East. All these cars will bear the logo, name and car number on the side. Most bulk commodity shipments, like coal, will be shipped on trains where every car will bear the name of the home road. What about other trains that carry mixed freight or even passengers. There are usually cars present marked for other industries, even other railroads.

I think you may see where this is going...If I am modeling a railroad as it was (or might have been) in the year 1949, I  need to know what those other industries and railroads were doing in the same year. I would not run FP40's or intermodal cars marked Allegheny Eastern. Neither should I run a BNSF box car or a new Norfolk Southern coal hopper. These are extreme examples, of course, but you get the idea. I should find out what was running on the New York Central, Santa Fe, or Chicago & Illinois Midland in 1949.

I have several freight cars that I purchased because I liked them. There was no other reason. Most of them have paint schemes that struck my fancy. Others were gifts or included in lots that I bought of E-Bay or at a show. Here are some examples...

New York Central "Pacemaker"

The NYC offered overnight LCL (less then carload) service between New York City and Buffalo way back in 1935. It was interrupted by World War II and reintroduced in 1946 as Pacemaker. In 1948 the service was extended from Buffalo to Boston over the Boston & Albany, which was owned by the New York Central. A photo from 1946 shows a string of the specially painted cars behind a 4-8-4 Niagara.
1946 New York Central "Pacemaker" Consist
Unfortunately for me, the Pacemaker cars never left their home rails. It's doubtful that any of these cars would have shown up on Pennsy or any other property not controlled by New York Central. Each railroad had its own expedited merchandise service.  The cars for this service on the Pennsylvania were primarily X41b and X29b class painted "boxcar red" with silver and white striping. A white PRR circle/keystone logo on a red background was prominently displayed along with the words "Merchandise Service" on the sides...
PRR Merchandise Service Boxcar
Like the NYC the Pennsylvania kept its expediter fleet within it's own system. So it'd be OK to have an entire train of these cars on the mainline, but not the NYC or any other merchandise service. Cars assigned to All East Merchandise service would stay on the Allegheny Eastern providing overnight service between Philadelphia and Pittsburgh or perhaps Chicago. They would be painted for this specific purpose.
Allegheny Eastern "Expediter"
Then there are those McGinnis colored cars from the New Haven and Boston & Maine. Were they around around in the late 40's? The answer is no. Patrick McGinnis served as president of the New Haven from 1954 to 1956. He moved on to the Boston & Maine in 1956. McGinnis colors should not appear on the Allegheny Eastern.
New Haven Boxcar in "Mc Ginnis" Paint

The New York, Chicago & St Louis Railroad, commonly known as the Nickel Plate Road started using the High Speed Service livery on its caboose fleet in 1946. I'm not sure when the scheme was applied to boxcars, but for now I'll take it as the late 40's. This car would appear in All East mixed freights.

Nickle Plate "High Speed Service"

The other consideration is what "technology" was available at the time. Some commodities, like grain, were shipped in boxcars. These were standard cars with "dams" placed across the doorways to hold the grain in. I don't think these cars were ever completely full. The load could have fit in a gondola, but since it needed to be covered during transit they used a boxcar. Covered hoppers for grain transport weren't in use yet.
Loading Grain Into a Milwaukee Road Boxcar
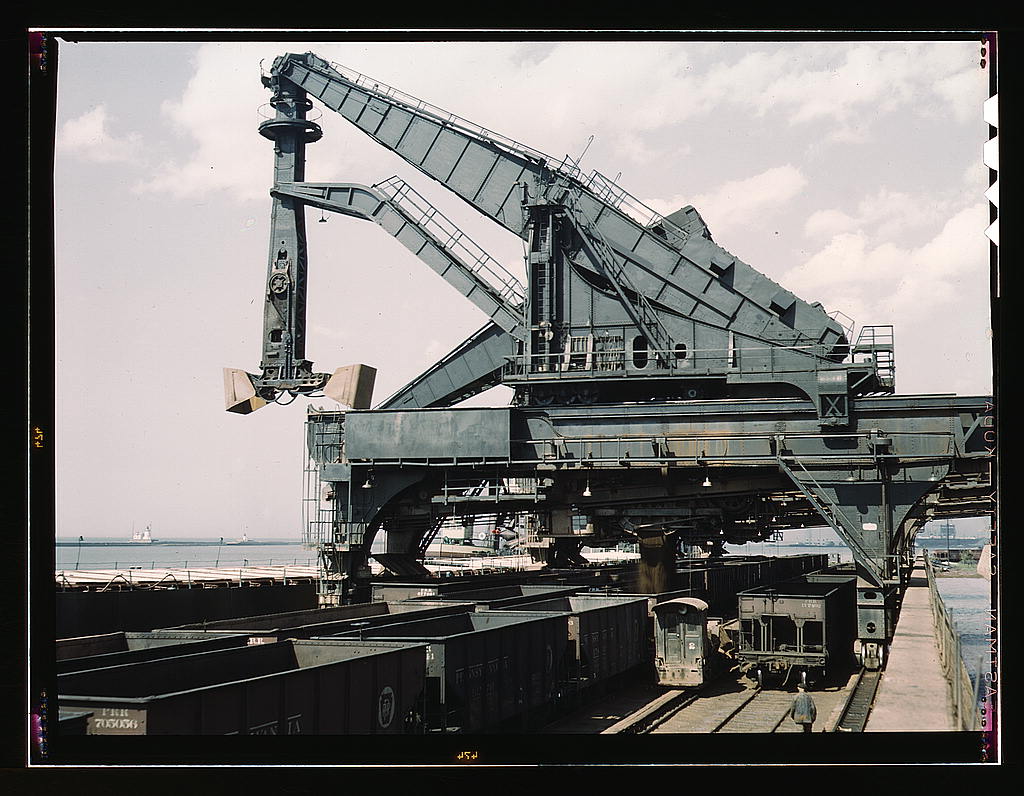
Another example would be iron ore. On the Pennsylvania this ore was shipped in open hoppers, usually 50 ton GLa class. Because the ore was so heavy, the load was piled in each end of the car over the trucks. These cars were never fully loaded. On the Pennsy, cars specifically designed for carrying ore did not appear until much later.
Hulett Machine filling PRR Hoppers in Cleveland
What about refrigerated cars for carrying produce and other perishables. Most of the reefers in 1949 still had ice bunkers. Powered refrigeration units were few in number. Icing stations were available at various points along the railroad to refresh the ice in the bunkers. Altoona was one of these places. Not only would reefers on the All East have roof hatches for the bunkers, there should be an ice house with sidings to service these cars.
Filling the Ice Bunker on a Reefer.
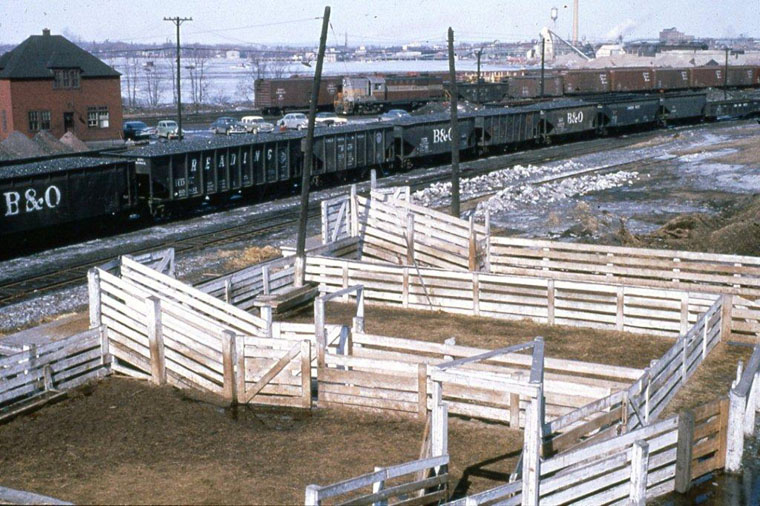
Stock cars would be handled in a similar fashion. Federal law dictated that live stock had to be unloaded at regular intervals. Many major yards had sidings with stock pens just for this purpose. Because of it's location I don't think Altoona had stock pens, but on a model railroad you want as many excuses for switching as you can get. The yard at Llyswen should have stock pen facilities.
Stock Pens
Foreign cars would also appear on a regular basis in passenger consists. Many railroads offered through service to cities they did not serve. It might have been possible to find Atlantic Coast Line or Seaboard cars mixed into PRR trains like the "Advance Florida Special" or the "Advance Silver Meteor".
Southern Pacific Sleeper "Glen Tarsan"

Let's not forget the ubiquitous Pullman cars. These cars came in a variety of colors, some of them reflecting the railroads that leased them.
Pullman Sleepers "Glen Pond" and "Glen Blair"
One final note...They were not "foreign" cars but the Pennsy had special heavyweight cars for shipping theater sets. These cars were named after plays, characters or authors like "Falstaff" or "Shakespeare".
PRR Class B70a Theatre Car "Shakespeare"
There were also heavyweight cars to ship race horses from one track to another, another excuse to use those stock pens.
PRR Class B74b Racehorse Car

I want to include some of these ideas into the trains on the Allegheny Eastern. It's one more way to create a convincing setting on my miniature rail empire.

Regards,
Frank Musick
Chief Cook & Bottle Washer
Allegheny Eastern Railroad


Friday, January 11, 2013

Laying Track

OK, so I got the routing done, I've test fit the parts, counted the sections of flex track I need, etc. Now's it time to actually lay some track. Before I do that though, I have to solder up a length BEFORE I curve it. I grab two lengths of code 80 off the pile and lay them down. There's twelve foot length of exposed bench work in front of Thorn that makes a perfect assembly area. First thing first, I plug the soldering iron in so it can get good and hot while I assemble the track. Then I start assembly. I put rail joiners on by slipping the entire "stick" of four joiners on the rails and then breaking off three. They break cleaner this way and I don't drop as many. Then I slide the rest of them onto the other rail and break off two, etc and so on...
Installing Rail Joiners
I connect the two sections together, making sure that the sliding rails are both on the same side. This side will face the center of the curve. I make sure the rails line up and there is no gap. I apply rosin with a micro brush  and make sure it covers the outside of the rail where it meets the joiner. 
Applying Rosin
Now it's time to place the iron against the  bottom of the rail joiner. If the iron's hot and the tip is clean the joint should heat up quick. Don't want to melt the ties. The rosin will smoke a little as it melts and flows down into the joiner. I run the solder along the top of the joiner against the rail. The solder should flow down into the joiner and leave a small bead. I take the iron away and the joint "freezes" as the solder cools. I don't have any photos of this because I'd need three hands to hold the solder, iron and snap a picture with my phone all at the same time. Suffice to say it works and I end up with a pretty clean joint. If it doesn't work I make sure the iron is clean, add more rosin and hit it again.
Soldered Joints
I keep adding sections till I have four (or five) lengths of flex track. I have to pick it up carefully (it gets a bit unwieldy) and move it over to the helix, laying it in a curve around the slot I using. When I do this the sliding rail will move.Even though ties have already been removed from around the joints as they were soldered, the joints on the inside rail will move and usually try to push more ties out of the way. I remove these so the joint can shift and keep forming the circle and removing ties as needed.
Applying Glue
With the track ready to be installed in the slot, I run a bead of tacky glue and use a brush to spread it along the bottom  I only need a thin coat of glue. Don't want it squirting up between the ties. The tacky glue gets, well, tacky in a few moments and will hold the track down while it sets. I move the flex track into the slot and  pin down one end while I work the rest of the length of track along the slot. I make sure the ties are tight against the outside wall of the slot.
Pin Down the End
Once I get the track laid around the panel I pin down the other end. This makes sure the track will stay in the slot while the glue sets. Since I laying the second track I check the spacing with a spacing gauge.
Spacing Gauge
The spacing is good since the slots were routed correctly. If the spacing was too close I would just move the tracks farther apart. Using a 1" bit for routing turned out to be a good thing. Hadn't thought I might need to make adjustments. The extra width allows me to do that.
Finished Level
The process gets repeated four times until all four tracks are in place. I leave the "weights" on the ends of the track and call it a day. Oh yeah...make sure I unplug the soldering iron. Don't want to burn the house down, I've gotten used to living indoors.

Only two levels to go.

Regards,
Frank Musick
Chief Cook & Bottle Washer
Allegheny Eastern Railroad