As mentioned before, the Allegheny Eastern is a freelance model railroad that follows the standards (at least some) used by the Pennsylvania Railroad. Some of the names have been changed to protect the innocent (and me) from accusations of blasphemy from my fellow Pennsy modelers.
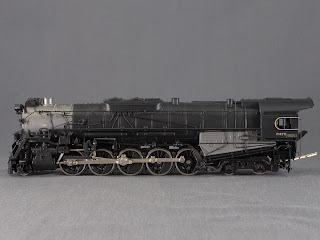
This word "freelance", much like the word "phantom", is a clever ruse to replace realistic replicas with less real and sometimes inexpensive stand-ins. Take the Pennsy's class J1/J1a. This locomotive is one of my all time favorite Pennsylvania locomotives. There are no commercially available models and I probably could not afford one if there was. There may be brass models in N scale, but such a model would definitely be outside the operating budget.
 |
| HO Scale Brass Model, PRR Class J1 2-10-4 |
Ahh...But this is not the Pennsylvania Railroad, this is the Allegheny Eastern. Unlike the Pennsy, which only concession toward the 4-8-4 wheel arrangement was the duplex T1 4-4-4-4, the All East management has no issues with the "Northern" type. There are 4-8-4 locomotives on the "Agg" and they resemble the J1/J1a class in many ways. They are classified R2, being the second such wheel arrangement on the property. The R1 class on both the PRR and the All East was composed of a single electric locomotive.
 |
| Allegheny Eastern Class R2 (Version 3) |
The R2 is actually a Bachmann Northern built from the parts of two I got pretty cheap. I wasn't sure what to do about it, thinking I might be able to use it as the basis for a 4-8-2. I'd just replace the trailing truck with one from a Trix K4 and rebuild a whole lot of other things. Then the guys at Railwire suggested that the Northern could be made into a "phantom" locomotive, a 4-8-4 that looked like a J. It had never occurred to me that a Pennsy Northern would look like anything but a T1. I liked the idea and took a shot at it. I borrowed a keystone number plate and a headlight from elsewhere. Then I remembered I had purchased a tender from a Berkshire. I filled in the pilot and the cab sides with Squadron Green putty.
I always try to take photos of my models. All of the imperfections jump out of the picture at you. I can go back to the workbench and try to correct them. On the R2, for instance, the cab has been done three times. The first cab was simply the Santa Fe cab filled in with putty and the window openings reshaped.
 |
| R2 Version 1 |
It didn't look right. The Jness just wasn't there. While the pilot sort of looked good, I had forgotten to paint the smokebox and firebox graphite. The cab window was also in the wrong place. So I made some changes.
 |
| R2 Version 2 |
The paint helped. I also made cab sides from styrene and glued them over the side panels. Things were shaping up but the cab wasn't sitting right. Try again. I straightened the cab and that did the trick. Because I had glued the new cab sides over the old cab, you can still see the old window frames. I will attempt to cut these out, but in the meantime I just painted that area the same paint I used for graphite. Some striping around the windows and some lettering will also help. While the oxide red looks great on the tender top, it doesn't on the roof. Have to paint that DGLE. The tender needs to squared off, maybe I could build a "Coast to Coast" from the Bachmann tenders. Need to add details and DCC and get her running.
I actually worked on two locomotives other the past two days. I got the drivers on my K4s to roll without hanging up. Only took about 17 tries. Then I brushed on some DGLE, red oxide and graphite. I'm still working on the motor and trying to add DCC. I had thought about filling in the pilot to make the more modern cast/welded steel version but I'm holding off. Still need to touch up the paint and add some details.


No comments:
Post a Comment