Maybe it's normal. Maybe a lot of model railroaders "switch off" to other tasks, other areas of the hobby. I know John Allen would do this to some extent. He sometimes built areas of the Gorre & Daphetid complete with roadbed and surrounding scenery and lay the track later. Considering all the track on the G&D was hand laid, I can understand. On the Allegheny Eastern, however, the tasks are not so tedious. Still I can't help thinking I'm avoiding something.
Maybe avoiding isn't the right word. Maybe "waiting" works better. Perhaps I am waiting for another stroke of serendipity to hit. This happens a lot. I sit on something for awhile and a new idea of how to do it comes along. Sometimes it's a solution to a vexing problem that I haven't found a fix for. Sometimes, like now, I just seem to be avoiding the question.
I know over the past week or so I've been working on projects that have been lying dormant for years. The GHQ L1s kit is one. I got mine "cheap" on EBay for $80. I paid about $60 for a Kato 2-8-2 at a show.
| Pennsylvania Railroad L1s Mikado |
This past week I found myself getting the box out again, but this time I didn't just read the instructions. I actually took the Kato 2-8-2 and started to modify it. It was going fine until I pulled a running board too far and the cylinder assembly came apart. All of a sudden I had a loose conglomeration of cross rods and valve gear. It took a great deal of time to get it all back together. TIP #1...Assemble the cylinder, valve rod and piston rod before you fit it to the frame. The crosshead guide should be put in place after the rest of the parts are installed. They have to fit in under the main rod so there is quite a bit of cursing and fiddling with tweezers. After an eternity I got everything back where it needed to be.
Assembling the kit was no cakewalk.Most of the parts are pewter. This means they are very soft and easily deform in all sorts of directions. Pressure of any kind will cause all kinds of fun issues. To top it off, the parts are glued together with cyanoacrylate (super glue). Too much glue and the parts will take forever to stick to each other while adhering immediately to your finger. Try to pull your finger away and whatever assembly you have completed comes apart or bends in some inconvenient manner. The cab is probably the worst part to build. Several tiny parts that must be at right angles to each other. It's probably better to assemble the cab before attaching it to the boiler but only if you use the correct parts.
Which brings us to a real problem with assembling this beauty, the instructions. No illustrations of the parts or the procedures required to assemble them, just text. I would be helpful to know that the cab floor doesn't look like what you'd expect. Took me a LONG time to figure out that the reason it wasn't going together was because the part I chose to use as the cab floor was actually the slope sheet for the tender (sure looked like a deck plate to me). In the meantime I had succeeded in warping every single part of the cab including the curved roof. TIP #2: read articles like Max Magliaro's BEFORE you attempt to assemble this kit.
Ah the joys of model railroading. Perturbed by the problems with the cab I switched to installing the handrails of the boiler. The handrail stanchions are minute, to say the least, and etched brass. It was several tries before I learned a trick to remove each one individually with tweezers and position it in the hole I had to drill in the boiler side. Tedious is a good term to use here, especially since I drilled the holes too big. Rather the slide partway into the hole and end up looking like a stanchion, the damned thing would fall into the hole and look more like a clunky lift ring. I tried filling the first set and drilling a new set of holes but that went south on me too. I shouldn't forget to mention that by this time the brass wire used for the handrails looked like unraveled bridge cable. Trying to fit the brass wire through the eyes of aforementioned stanchions was the easiest part of the task.
Most of the detail parts are so small that I could barely see them. Even if I could see them, manipulating them with tweezers was like threading a needle with your eyes closed. Especially if your no longer blessed with steady hands. A lot of parts, including the handrails, were left off for sanity's sake.
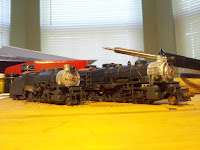
I now have two L1s locomotives on my roster. Since they are based on Kato mechanisms they run like Swiss clocks. Cosmetically, however, both will require some rework before I'm happy with them.
 |
| Allegheny Eastern Class L1s 2-8-2 |
 |
| Allegheny Eastern Class L1s 2-8-2 |
Regards,
Frank Musick
Chief Cook and Bottle Washer
 |
| Allegheny Eastern Railroad |

No comments:
Post a Comment