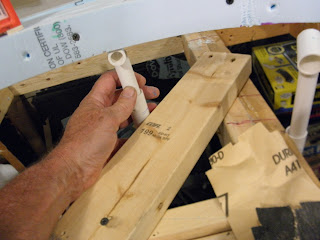
Since our last adventure I've done some tinkering with the support system and ironed out a couple of kinks. I made two minor changes to the "Tee" part of the smokejack supports. First I started making the crosspiece out of 3/4" I.D. PVC pipe instead of the 1/2". This allows me to drill a 3/4" dia. hole through one side. The hole is then reamed to a close fit for the 1/2" I.D. PVC upright. The 1/2" pipe is pushed into the crosspiece as far as it will go and glued in place. The resulting joint is much stronger and the part is easier to make.
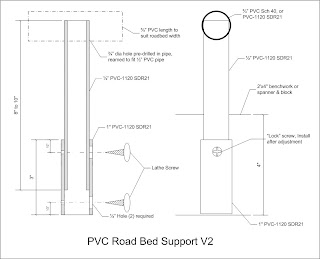 |
| "Field Modified" SmokeJack |
I started making the new version by drawing a mark every 2" on a length of 3/4" I.D. PVC pipe. Every other mark is the center for a 3/4" dia hole. I then drilled these holes using a general purpose 3/4" dia. drill bit. I recommend using the general purpose bit because it makes the cleanest cut in this material. Wood bits, like spades and borers tend to catch in the plastic and create a jagged hole (if not a broken pipe). I then checked the holes for fit using a section of 1/2" I.D. PVC pipe. If the pipe didn't fit then I reamed each hole a bit at a time until there was a close fit. This close fit makes for a better joint that can be glued inside and out. I "gang assembled" the uprights...
 |
| Smokejack Gang Assembly |
I then made sure each one was perpendicular with the crosspiece using a small hobby square. I adjusted the upright before the glue set...
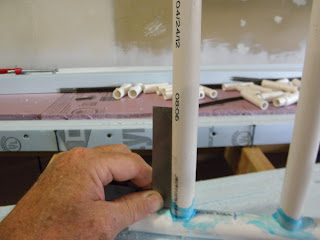 |
| Checking for Perpendicular |
Once the glue has dried, I cut the 3/4" pipe on the other marks I made, creating a 4" wide "Tee" just right for a four track roadbed support.
The first post heading downhill is at MP2. I made the section between MP0 (top of helix) and MP2 level. In the photo below you may notice the gradeometer is not showing level, which means it is..(Got it?).
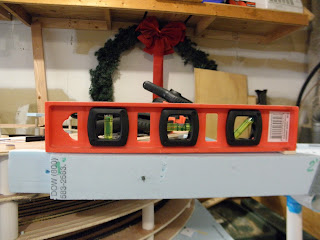 |
| Gradeometer at MP2 |
Now that everyone is confused let's go to MP3 where the grade actually begins. Here the gradeometer starts its work. You should be able to see that the bubble indicates level, which means the grade is roughly 1.5%. The block of wood at the right end of the level is about 3/16" thick. A 3/16" rise (or drop) over 12" or so is close enough to 1.5% for me to live with.
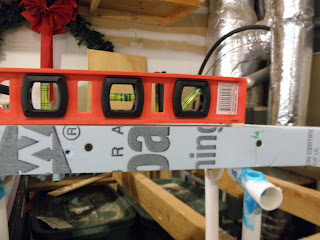 |
| Gradeometer at MP3 |
Once I get the grade confirmed I adjust the smokejack to touch the bottom of the spline. The supports are a tight fit into their sockets so I use a pliers to grab the upright and move it up or down as required...
 |
| Adjusting Smokejack |
When the support is set to the proper height I lock it in place by driving a drywall screw through the socket and upright...
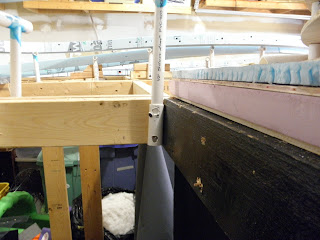 |
| Lock Screw at MP2 |
While some of the sockets are attached directly to the work bench the 2"x 4" grid isn't always in a convenient place to mount a socket. In that case I need to install a 2" x 4" "spanner across the grid.
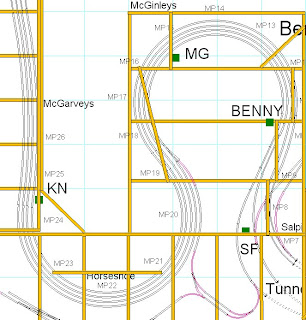
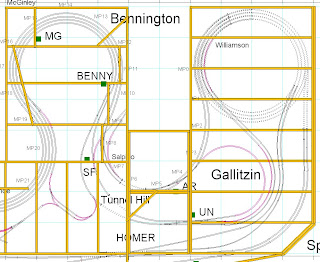 |
| Approximate Spanner Locations |
Most of the spanners are installed with a block of 2' x 4' fastened to the top. Each socket requires two screws for mounting. The block provides a place for the second screw...
 |
Spanner Block
|
I said most of the spanners are installed with the block fastened to the top. This worked until I got to MP22, the center of Horseshoe Curve. I had prefabbed the spanner, installing the sockets before I mounted the spanner in place...
 |
| WRONG! |
There I found I needed to go lower in order to maintain the grade. The problem was that the smokejacks were as low as they could go. I thought for a moment and turned the thing upside down and spinning it end to end to keep the supports oriented to the roadbed. I then installed the uprights and adjusted the height...
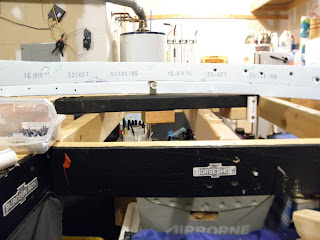 |
| Corrected |
This will probably be typical for a few more mileposts. I'm thinking I'll have to go to some sort of block upport after MP25 or so.
One thing I should show is how I locate the supports and spanners. Since the roadbed already exists it's pretty straightforward. I just place the upright where the support should go. It's either right at the milepost or as close as I can get. If I need a spanner I throw the 2' x 4' in place and line it up with the upright. I then mark the location on the spanner or benchwork with a Sharpie...
 |
| Locating the Support |
One other thing...I had started to fasten the roadbed to the smokejacks by driving a long drywall screw through the spline into the Tee. Not a good idea. It's better to perform this step after the grade is complete. I needed to leave the roadbed loose so I could work on the underpinnings. There is a good chance of breaking the spline if one part is pinned down when you lift it. Fortunately I realized this before I got too far.
Currently I'm at MP23 which is the approximate location of the fill at the right side of The Curve. Only 17 feet to go!
 |
| Horseshoe Curve |
Regards,
Frank Musick
Chief Cook and Bottle Washer
 |
| Allegheny Eastern Railroad |


No comments:
Post a Comment