As far as I can tell, about 60-70 people view this blog on a regular basis (or one guy with a very short attention span). I'm honored that those 70 (or one) find this babbling interesting enough to read. Then again, it may be like that Miley Cyrus video. Like a train wreck, you keep watching it over and over.
Anyway, I get the general feeling my fellow human beings are softly saying "Will you get the damn track down already!" every time they visit. I really am working at it. There's not enough to show yet. Then too, there are no blunders in the process to share. So the work goes on.
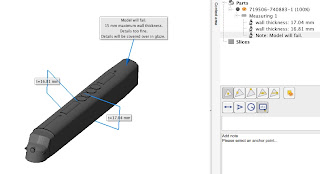
But then I received an e-mail from Shapeways on the centipede "blank" I submitted. I quote...
"Here is why we cannot print your model:
Model should be hollow, too."
 |
| Shapeways "Diagnosis" |
Had to laugh. I had sent a hollow model to the "other guys" and they canned it. I had made the walls too thin. That's why I sent a solid object. The "other guys" were OK with the solid, but too expensive ($114 US I think). That's why I went with Shapeways. You'll see the image above indicates the "Deatils will be covered over in glaze". This is because I was being clever and thought I could save some money by having the shape produced in black ceramic. Price difference is on the upside of $20. There was a sandstone option that probably would have worked but I should have taken the hit and gone for plastic. There are just some things you have to spend money on.
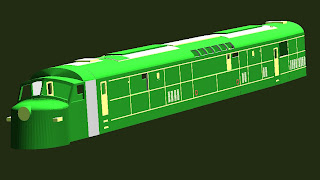
The upshot of all this is that now on another tangent. I'm obsessed with the centipede model. As soon as I got the e-mail I started reworking the shape. I added (subtracted?) material from the inside. This made me realize I could now add window openings. While I was doing that I realized what has always bothered me about the appearance of the nose. Doesn't look "babyfaced" to me. Then I saw that I had rounded the top of the nose too much so I changed that. This meant I had to change the rest of the nose to suit. Correcting the nose led to changing the cowling and windshield which in turn affected the forward sides. Then I added the side window opening in the cab, etc and so forth. I went whole hog and created the actual model I want to print...
As always, I'm doinng this the hard way. As I said before, the original digital shape was created for Microsoft Train Simulator. I use a program called Train Sim Modeler. It was originally created for shapes in Flight Simulator and adapted to MSTS. It's interface is pretty simple, but much like a CAD program. I should use an actual 3D development program like 3D Canvas or Blender, but the learning curve is steep. I do use 3D Canvas, but only for translating the TSM files to STL (stereolithography) format for the 3D printer.
 |
| Centipede in Train Sim Modeler |
As always, I'm doinng this the hard way. As I said before, the original digital shape was created for Microsoft Train Simulator. I use a program called Train Sim Modeler. It was originally created for shapes in Flight Simulator and adapted to MSTS. It's interface is pretty simple, but much like a CAD program. I should use an actual 3D development program like 3D Canvas or Blender, but the learning curve is steep. I do use 3D Canvas, but only for translating the TSM files to STL (stereolithography) format for the 3D printer.
 |
| Centipede in #D Canvas |
I then import the file into a program called Meshlab. Meshlab lets me analyze the model and "fix" any problems. Simple, right?
 |
| Centipede in Meshlab |
So...I save the "massaged" file from Meshlab (still STL format) and send this file to Shapeways. The trouble is the new detailed file is stuck at the Meshlab phase. The software keeps detecting what are called "non-manifold" edges. While I don't completely understand the whole "non-manifold" issue I do know it means the model cannot be printed. The original solid shape had very few errors and was easily repaired. This more detailed version is chock full of the little buggers. The program repots almost 7000, which may give you an idea of how complex these shapes can get....
 |
| Non-Manifold Edges |
Anyway, I found that some of the errors were from duplicate surfaces, two identical parts in the same place. It happens. Sometimes it's hard to keep track of changes and you duplicate things. What I had to do was take the entire model apart (it has what might be called sub-assemblies). Then I started testing each subassembly for errors...
 |
| Sub-assembly, No Errors |
This part is the first one I reworked when I saw the disastrous fail. As you can see, there are no errors. I found that the parts I expected to fail, the curved parts of cab, for instance, had few if any problems. If they did they were easily repairable. Meshlab says there are only 10 non-manifold edges after the rework, most of them in the cab...
 |
| Small Errors in Cab |
The tiny non-manifold edges in the cab are repaired by deleting the related polygon faces and then filling the holes. The easiest place to do this is in the Meshlab sodtware. It's designed with utilities to make corrections like these...
 |
| Corrected Cab |
You'll notice the program also can display information on the size of the object. Crteating an object in TSM is not an exact science. It's not like a program such as AutoCAD where you can feed in exact measurements. In TSM you build the object against a scaled backdrop, almost like you're tracing the shape. There is a dimension function, but it only allows you to check a measurement, not create one...
 |
| "Tracing" a Shape in TSM |
Still a lot of rework and error checking before the files go back to Shapeways. I'll let you know what happens
Regards,
Frank Musick
Chief Cook and Bottle Washer
 |
| Allegheny Eastern Railroad |
.

No comments:
Post a Comment