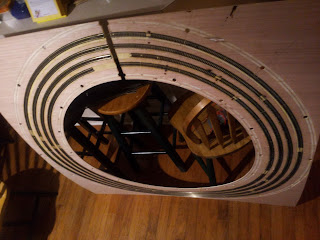
After a few weeks of confusion construction is moving forward again, albeit slowly. As I mentioned before I pulled up all the track. I managed to re-lay Atlas code 80 on the first level of the helix. I believe this is version 4, but I've lost count.
I was just reading the latest issue of Model Railroader and realized I was missing out on the commercial value of my blog. Using MR articles as a pattern I thought I might make my blog more appealing to advertisers...
To construct my helix I used 1/4" plywood manufactured by Canadian Plywood LLC. I routed grooves for the track using a router sold by Sears under their Craftsman brand. I made an "adjustable" router base from the plywood by using a Ryobi drill to predrill several holes. These holes allow me to change the center of the groove so I can route the various radii used in the helix. I then cut out the overall shape of the template using a Black and Decker jigsaw.
After creating the grooves, I moved the helix parts into the kitchen so I could lay the track from a comfortable sitting position. I placed the helix panels on the kitchen table, which I had purchased from Stan's Second Hand Boutique. Sitting on a chair I also purchased from Stan's I turned on the kitchen light by using a wall switch provided by Square D. This switch is wired to an overhead light fixture using Nomex brand 14 ga wire. I made sure the fixture was equipped with a fresh Sylvania 75 watt bulb before attempting any construction work.
I used wood glue manufactured by Titebond and sold at Lowes (and other fine home improvement centers) to fasten Atlas code 80 flex track to the plywood. After gluing the first section to the plywood, I used track nails from Model Power to hold the track while the glue sets. I placed the Atlas code 80 rail joiners on the rail ends and attached the next section. I applied acid flux from Aaeon Flux using a Fuller Brush company #4 brush. I then soldered the resulting joint using The Solder Guy Incorporated's #000 solder. I let the joints cool and glued the next section into the groove. Using this procedure I was able to complete level #1...
 |
| Level 1 |
Enough of the tongue in cheek. Don't know how MR does it. Seems to take something out of the narrative and requires too many extra words. It's a wonder each article doesn't require an entire magazine. They'd have to drop all those real advertisements.
Anyway, working on level 2 has been a bit of a challenge. I'm using the old Rapido flex track. It's code 80 but it appears to be steel rather than nickel silver. David Smith from Railwire (another name drop) had informed me that Rapido's other track products were steel. Seems like they went the same way here. The stuff does not take to solder well. You can create a joint, it takes a LOT of solder. It's almost like you have to fill the rail joiners to make the joint. Even then the joint may not be solid. You can see by the photos that you burn up the plywood (and tie strip) more than anything else. Just as I mentioned above, I glue each section down with Titebond and "clamp" it with track nails til the glue dries. I then pull up the the nails and reuse them on the next level.
 |
| Rapido Rail and Atlas Joiners |
 |
| Burned Plywood |
When I'm bored with the track laying I fool around with building the N5e cabin car or the centipedes. I bought a "Northeastern" style caboose that looks somewhat like the N5e...
 |
| "Northeastern" Style Caboose |
I purchased another cheap Bachmann DD40 on EBay and promptly removed the trucks when it arrived I now have the parts for a set of centipedes...
Although SAL and NdeM ran the big Baldwins as single locomotives, the Pennsy ran their's as a draw barred set, never separating them. They were scrapped in pairs. They were purchased as 6000 HP passenger units, which is what I'm modeling, and held that roll for a few years before being derated to 5000 HP and assigned to freight and helper service...
They worked several grades on the PRR, including the East and West slope of the Alleghenies and the Belmont Plateau just west of Philadelphia.
I tossed the shell I had cobbled together in the trash. No point in even trying to save it for scrap. I'm hoping I can make a new shell that will capture the impression of these mammoths. |
| Potential Set of Centipedes |
Although SAL and NdeM ran the big Baldwins as single locomotives, the Pennsy ran their's as a draw barred set, never separating them. They were scrapped in pairs. They were purchased as 6000 HP passenger units, which is what I'm modeling, and held that roll for a few years before being derated to 5000 HP and assigned to freight and helper service...
 |
| PRR #5830 Class BH50 |
| PRR #5827 Class BP60 |
They worked several grades on the PRR, including the East and West slope of the Alleghenies and the Belmont Plateau just west of Philadelphia.
Still working on Level #2 and hope to make some real progress over the next week.
Regards,
Frank Musick
Chief Cook, Bottle Washer and Director of Advertising
 |
| Allegheny Eastern Railroad |

Your MR style name dropping is hilarious. I know exactly what you mean. It sometimes seems half their articles are nothing but embedded advertisement.
ReplyDeleteThat helix is really kicking your butt, huh? I admire your persistence.