Sunday, September 27, 2015

Now We're Getting Somewhere

As I wrote earlier, the plan that John Allen created was modified by Rick Van Lear. I used Rick's plan as the basis for my layout and adapted it yet again...
Modified Track Plan
"Field Modification"
I tried to color the track so the modifications would show up better. The green lines are the outside loop. The red are the mining branch. I didn't change the full size drawing glued to the slab. Instead I'm building the changes into the spline...
You can see that I'm running the spline straight through rather than turning to the left.

Normally I build the spline first and then elevate it. I started out that way but ran into a problem. Unlike the N scale layout the curves here are tight. I couldn't let the spline follow it's natural curve..
Spline
It took a while to get the spline to line up with the track plan. I had to rebuild some sections  Spent quite a bit of time waiting for glue to dry. After a few days I had about 99% of the roadbed in place.

Next came the cork ballast strip. I used a commercial product this time and fastened in place with tacky glue. Once the cork was down I took the flex track from the "test" layout and relaid it on the new layout. I then disassembled the test section and last vestige of the N scale layout went to recycling.

Only the "mainline", the oval is in place at this time. It's enough to get a train running for the time being...
Current Layout
One other thing I did on this layout was put the fascia on. At least part of it, anyway. I was going to do this on the N scale layout but never got around to it. Quite a few models fell to the concrete below and ended up in the repair line or scrap box. I didn't want a repeat of this, so I ran the fascia on the sides of the foam slab. It's held in place with industrial adhesive and counter sunk screws. In the images you can see it is quite high. Better safe than sorry.

The branch line to the mine will require several turnouts. I'm debating on whether I should buy ready made Atlas products or build my own. I had tried building some turnouts in N scale. While they weren't acceptable, they did provide some experience with the process. Since HO scale turnouts and their parts are larger it may be easier to create some. We'll see.

While running the first train it became obvious that the roadbed wasn't level. I compensated for this issue by placing long thin strips of artboard under the ties. I checked everything with a small level getting it as close as I could. Then I ran a train and watched its progress very carefully...


Regards,
Frank Musick


Friday, September 4, 2015

Progress

It took a while to sort out the intricacies of the PVC "stand". In the end, I probably spent more than I meant to. There was some trial and error and if it was wrong I would redo with new fittings. The final result, however, was a very sturdy and light structure...
PVC "Stand"

The PVC was tearing up the foam slab so I added a subtop of 5mm underlayment to make a flatter surface to mount the foam on...
5mm Underlayment

The support frame probably needs adjustment but that's just a matter of turning a leg up or down to level things out. The foam slab isn't fastened to the subtop yet, but will be if and when I find the Liquid Nails I bought. In the meantime I decided to lay the slab down and start gluing the track plan...
Track Plan Glued in Place

In the past I've used wall paper paste. I don't like what happens to the paper when it gets wet. This time I glued the plan to the foam using a spray adhesive. I bought the cheapest I found at Home Depot. I made sure to try it on some scrap foam first. Nothing like having your new layout dissolve into goo on the floor. I carefully laid out the two halfs of the plan and rolling up one end covered about 6" of the foam with adhesive. I placed the paper down and used a dust brush to smooth it out. I kept going like this a foot at a time until both sheets of paper were fastened to the foam.

I actually impressed myself with the results. I must be getting the hang of this.

I laid out some foam roadbed strips to get an idea how the next step would go. I made my own foam pins using piano wire. I cut a 4" length of wire and bent the last inch 90 degrees...
Foam Pin 

I pinned down the on strip making sure it matched the center line on the track plan. This will form the center of the spline...
Foam Roadbed

At this point I modified the track plan by running the spline in a different direction. Rather than have the double loop shown in the track plan I decided for a single loop on the outside. The inner loop will form a branch that serves the mine at the top of the grade...
Modified Plan

I then laid out the adjacent strips, staggering the joints. At this point nothing was glued down yet so the joint looks bad. This is OK, this section of the spline isn't complete yet...
Staggered Joint

To glue all this foam together I use Aileen's tack glue. I accumulated quite a bit building the last layout. A lot of people insist it's not a permanent adhesive. They should try using it. I've had excellent results...
Tacky Glue
 
To build the spline I ran a bead of glue down the track center line of the plan. I placed the foam down and then slid it back and forth to spread the glue evenly. I pinned the foam down temporarily and stated on the outside strips...
Building the Spline

I ran a bead of glue along side the center strip and then anothe bead down the side of the strip. Again I slid the strip back and forthe and up and down to spread the glue. I did the same for the other strip. You can see that the loose joint shown earlier has now tightened quite well...
Three Strip Spline

In previous projects I used drywal screws as clamps to hold the strips together. I usually left the screws in. This time around I have a bunch of real clamps. I got out my clamp box and went to town...
Box O Clamps

As you can see, I made liberal use of them...
Spline Glued Up and Clamped.

The roadbed for the branch up to the mine will be laid after I put down some ballast strip and track. I want to run some trains!

Regards
Frank Musick
 

Monday, August 31, 2015

The Basics of The Layout

Designing a model railroad to fit in 32 square feet is a bit of a brain buster. While I developed the plans for the previous layouts, it took a lot of trial and error to get a design I liked. Not sure I want to do that again. Instead I went through a few published track plans hoping one or a combination of several will get me where I want to go.

I mentioned last time that the layout is currently a section of the dismantled N scale one. It's a sheet of 1/2" flake board supported by a 2" x 4" frame and legs. It works but it still isn't very portable. I started thinking of alternatives. I' using 4' x 8' slab of 2" thick styrofoam. Cost about $30. The slab serves as a VERY light table top.

I'm using PVC pipe to create a "stand" for the slab. PVC is rugged, easy to work and dirt cheap. The pipe and fittings came to about $69 in total. The pipe is $6.25 for 10 feet. It's much lighter than 2" x 4" studs and cheaper than the $100 or so for cabinet quality dimensioned lumber...

PVC Frame "Stand"


The drawing should give you the general idea. The diagonal braces and legs are removable.
General Layout Assembly


The track plan I'm using is from the Model Railroader supplement "Easy 4 X 8 Layouts You Can Build". The article, "Capturing a Slice of Appalachia in 4 x 8 Feet", is an overview of the Rosston, Joelburg & Holly Railroad built by Rick Van Lear...
Rosston, Joelburg & Holly Track Plan

Rick's plan is adapted from John Allen's first Gorre & Daphetid. John's little layout was incorporated into both of his larger model railroads. Rick's plan could also be expanded and become part of a larger layout...
Full Sixe Print of Track Plan

Before anything else can be done a full sized copy of the track plan has to glued to the slab with wall paper paste. To get the plan printed I scanned into Paint Shop Pro, rescaled it to full size and printed it to a PDF file. I took the file to a local FED X Office that has printers that create large prints. I found I had to split the full size 48" x 96" image into two 24" x 96". The printer cannot handle more than 32". At $0.75 a square foot, the thirty two square feet of print cost $24. 


The roadbed will be the "styrospline" I used on the earlier layouts. It's light, easy to build and sturdy. I cut 2" strips from a 4' x 8' sheet of 1/2" thick extruded foam.


Styrospline Strips

The strips are then laminated together. I had originally thought the spline would need reinforcing strips as shown here...
Styrospline Construction
Turns out no reinforcment is necessary. The laminated spline can take quite a load if supported properly. A one foot span of single track (n scale) can support about 70 pounds.

For any track with an elevation of zero the spline is glued directly to the slab. Vertical elevations are supported on pillars created from stacks of foam.

Creating grades with the styrospline is rather unorthodox. I build the entire spline on the same level. I then build the pillars for the highest elevation and work from the top down to form a grade. Transitions between level sections and grade sections are inherent in the spline itself. The roadbed, for all intents and purposes, is one continuous piece...
Styrospline Transitions


Time to put it all together
Regards,
Frank Musick

Wednesday, August 19, 2015

Fresh Start

The Average Eastern is no more. It has been completely dimantled and all the equipment stored in nice padded boxes. Better than me being stored in a padded cell.

Looking back on it I tried to do too much. Despite the fact that it was N scale the scope of the thing was probably beyond my skill level. Probably? That's and understatement. Both the Allegheny Eastern and the Average Eastern were just too big for my talent and resources. It was like restoring a 57 Chevy after watching one of those TV shows. Viewing Gas Monkey Garage does not a restorer make.

While I'm waiting to purchase a new home and move closer to the grandchildren I still read my Model Railroader and visit the hobby shop. This may or may not be a good thing. I've been looking at some of the larger scales. "Gee, I wonder what G scale is like?" or maybe "Should I try On30?". Half hearted attempts to maintain my interest, although the whole idea of radio controlled Bachmann's running through the backyard does seem kinda cool.

Then last week I visited the Dixie Flyer in Wartrace, Tennessee. As I usually do I wander through the store and end up buying nothing or a bag of rail joiners. This time, however I stumbled across a 2-6-0 camelback in HO scale. It was affordable (in my budget) and I love these odd locomotives. I thought about it for a day and went back to purchase it. I bought a few cars too.

I save a 4' x 8' part of the previous layout. I used this and laid some code 83 flex track in a simple oval and started running trains. I used my Atlas Commander DCC system for power and control. The loco has no decoder yet. I plan to install one, this time with sound. I threw a few vehicles in for scenic interest and Voila!!!

I'm trying to create a wood sheathed caboose from another center cupola caboose. Something more appropriate than the steel one shown here. The caboose on the siding is an old Model Engineering Works logging caboose. I bought on a whim.

I have no idea where this is going. I'm starting out simple. I have no name for the "railroad" yet. I will get the track off the tabletop and onto some roadbed. I'm thinking of using the same styrofoam spline developed for the N scale layout. The spline is created by laminating 1/2" thick styrofoam strips. It's about 2" high allowing me to have scenery below track level.

I have also thought of using a 4' x 8' chunk of 2" extruded foam rather than a wood table top. The relocation looms large and it sure would be nice to have a light, portable layout. I'll think on it a bit.

Regards,
Frank Musick

Wednesday, February 25, 2015

Dismantlefication

The dismantling process started last week. The first step was to tear the Average section apart...
Step 1: Hollow Mountain

Clarks Summit: Empty Roadbed

Split River Bed, Neked Right of Way

Should have left the bare roadbed intact. New hobby idea...Modeling Rails & Trails.

Destroying Average yielded a 7' section of benchwork that was under the Split River... 
7 Feet of new Average
Another 8' section needs to be built. The two sections will be bolted together, It will make them easier to move in the future

Benchwork Removed: Top of the Bookcase
You can see the growing pile of debris in the aisle at the left of the photo. It's time to go at the bookcase. I had to move these...
Fifteen Feet of Books

Pile O' Books
Fortunately the 2" x 4" frame is aturdy. Must be several hundred pounds of paper there.

I forgot to take a picture of the "disassembled" bookcase. Needless to say there was quite a bit of broken wood filling the aisle. I filled the Ranger's 6 foot bed with scenery, styrofoam, and flakeboard. The bookcase and attached benchwork served as a kind of anchor for the layout. The other sections are mounted on casters. Without the book case they tend to move a bit when leaned on.

I laid the indispensable parts of the layout on the Owertown section. Trains, tools, controllers, DCC system, scenery items and a host of other paraphenalia...
Owertown
I've learned the hard way that model trains, especially N scale model trains, have a tendency to migrate to the garage floor. This migration, often as not, has little to no effect on the concrete. It does. however, take quite a toll on the migratee. I don't keep the little plastic boxes the trains come in, and many of them never had boxes to begin with. Even if I did keep them I would still need a place to put a jillion boxes full of rolling stock. I chose to make my own storage boxes. I purchased a few plastic storage containers and lined them with foam my wife had left over from upholstery projects. A bit of tacky glue to hold the foam together and Voila!!! Some place to keep things like this out of the parts bin...
Lehigh & New England #705 ALCo FA1 A-B Set

Train Storage

Sharks, Steam & Cabeese

I probably could put foam between the items, but the foam does a good job of keeping things in place. As long as the box is handled carefully, IE not dropped or thrown across the room, they should do the job. I need about four or more for the rest of the rolling stock.

That's it so far.

Regards,
Frank Musick

Building a dream layout on a nightmare budget
The Average Eastern Railroad

Sunday, February 15, 2015

Relocation?

The Average Eastern is faced with a new challenge. It's more than likely the layout will need to relocated in the near future. Not far mind you, just thirty miles or so. This presents some difficulties. For one, the new home of ther layout will be a bonus room, not a garage. Believe it or not, The Boss, aka Wife, has decreed that the Average Eastern shall not be consigned to a garage. The layout will have its own room in our new house. A room with heat, air conditioning and finished walls. I love that woman.

While each section of the benchwork is is mounted on wheels none of them are designed to pass through a normal doorway or up a stairway. These considerations have caused me to rethink the basic idea of my model railroad. As it stands the layout will have to totally dismantlied. How can I take advantage of this situation?

I decided that it might be a good idea to modify the layout so it can be moved to its new location. and fit when it gets there. We don't expect the future location to be bigger than the current space. In fact it may be somewhat smaller. In all likelihood we'll be dealing with a bonus room, typically 15' x 20' in size. The Average Eastern's current benchwork is 9' wide and 15' long...
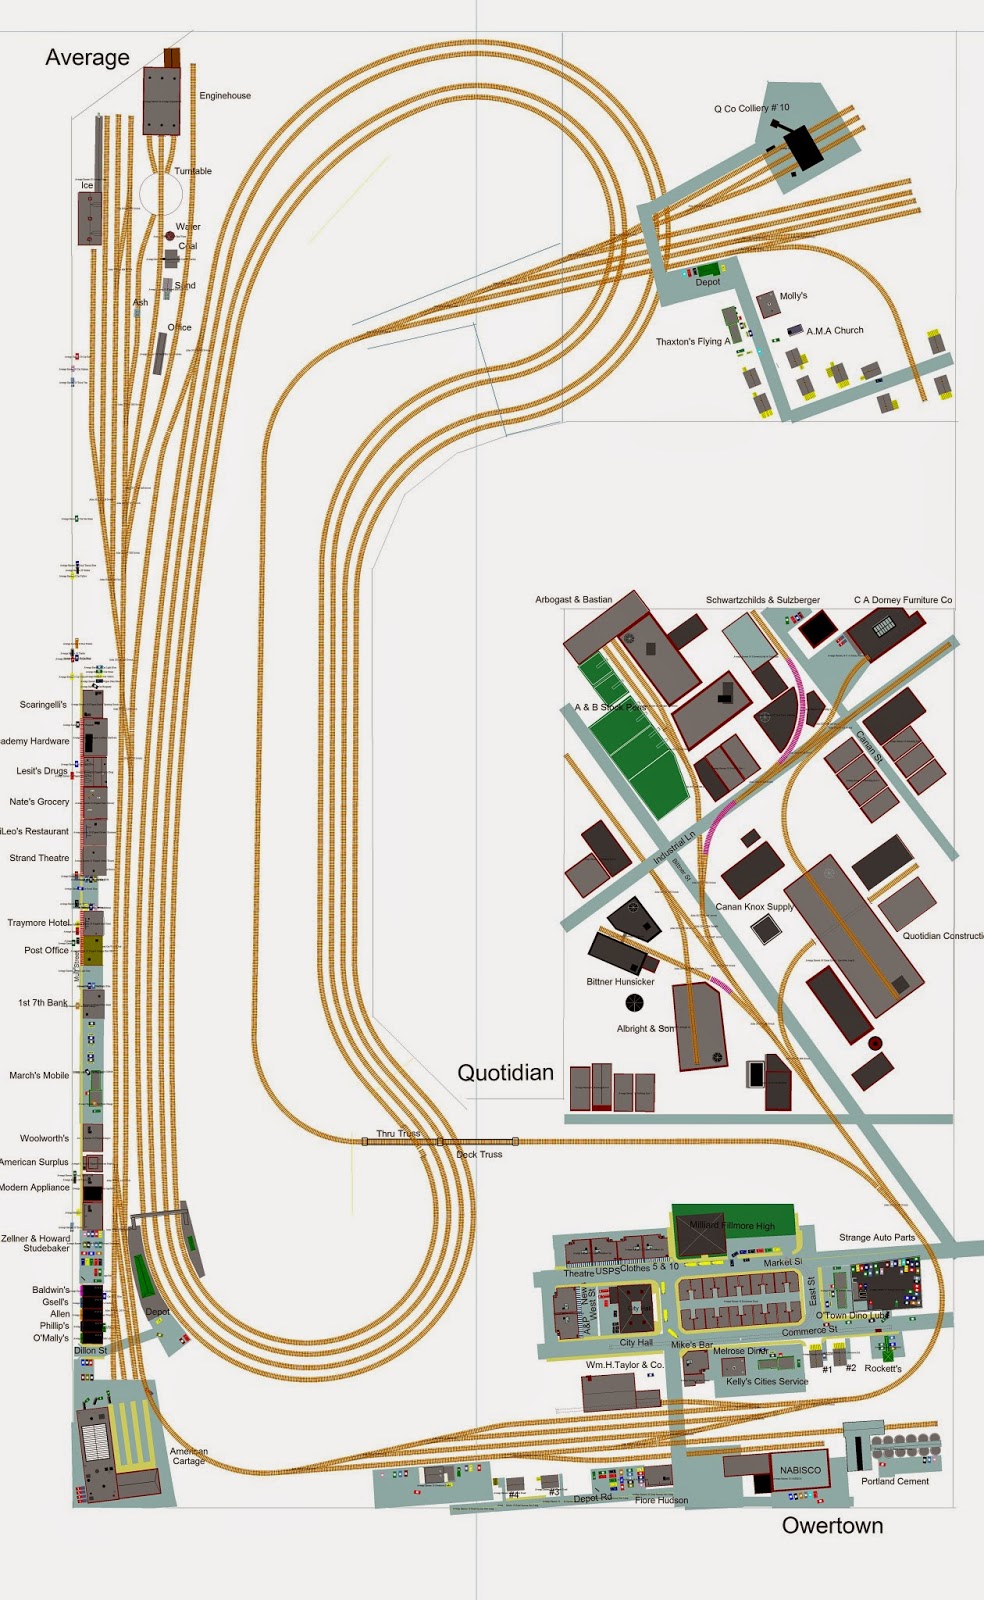
Track Plan: Current Average Eastern

One of the biggest issues to moving the layout is the long bookcase that supports the Average side. Fifteen feet long, the beast was cobbled into a single unit fron three smaller bookcases. It is firmly attached to benchwork, thus making it impossible to easily move it or the rest of the layout. In any scenario the bookcase has to go. If it does, the town of Average will have to disappear along with it.

I fired up XTrakCAD and started playing with track plan. After several attempts I came up with what I hope will be a reasonable design...
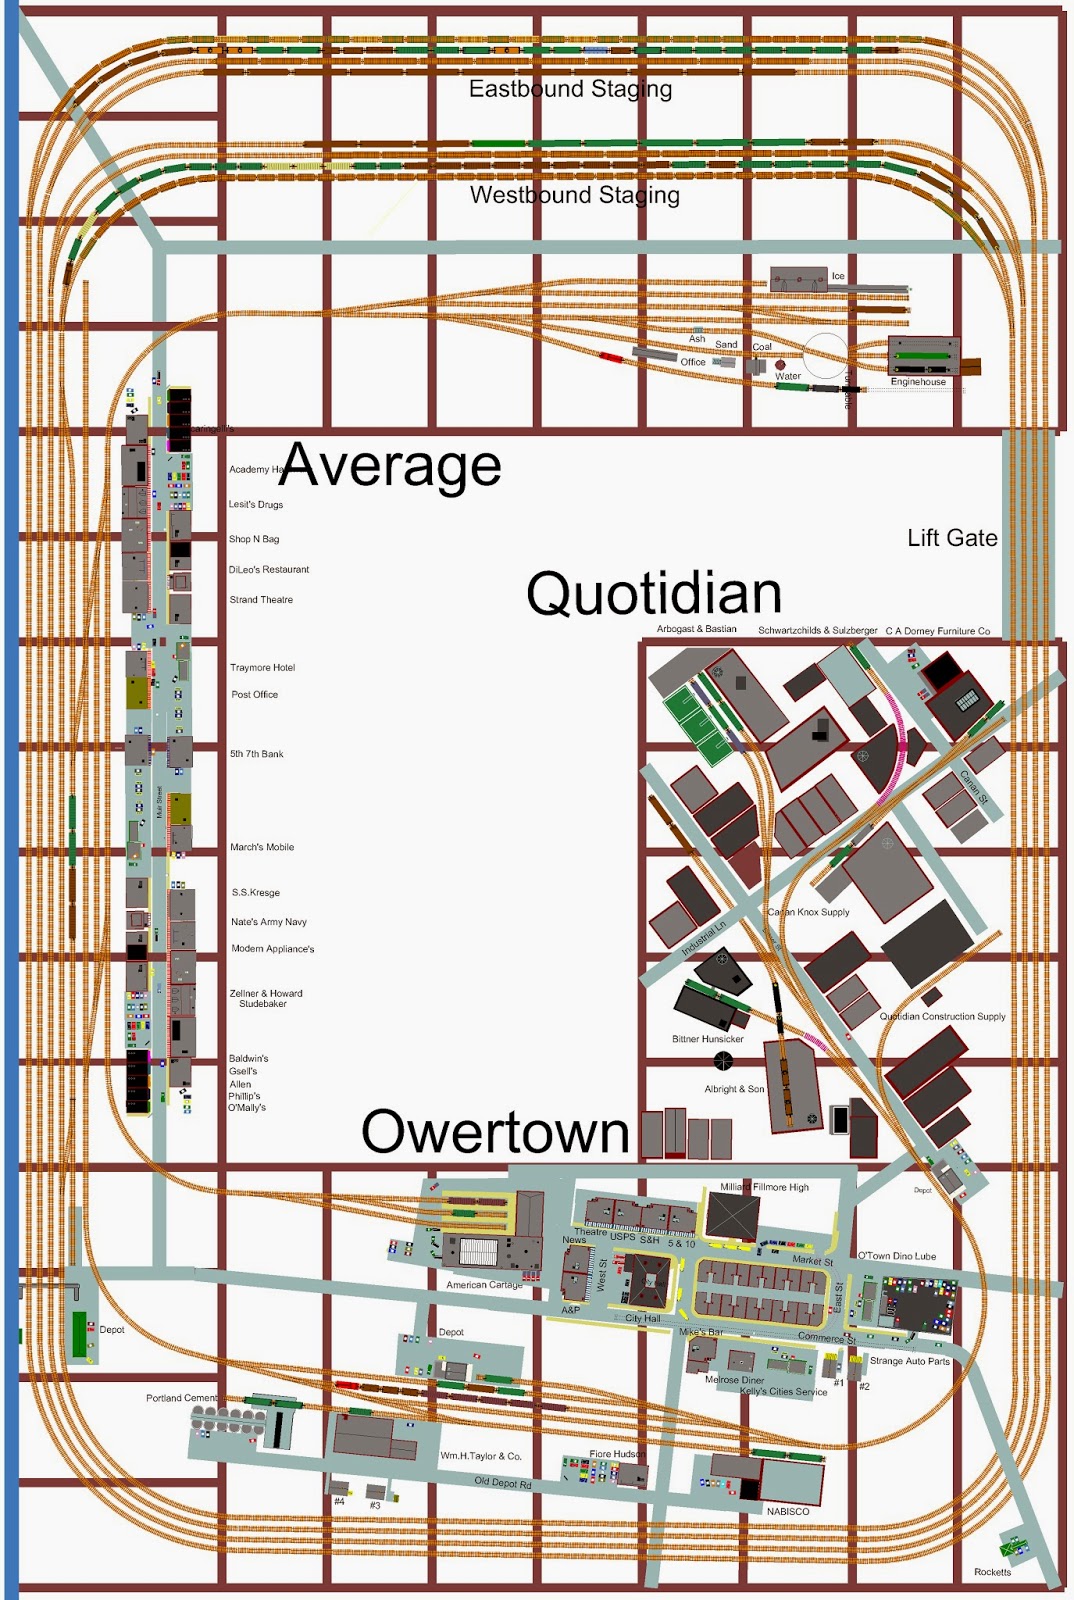
Track Plan: Average Eastern Redesign

The new design is 10' wide x 15' long. It is comprised of four sections. The 2' wide by 15' long.benchwork section replaces the bookcase. The aisle has been eliminated and this "extension" mounts directly to the wall. The two large 4' x 8' sections are attached to the Average extension. Quotidian has its own 4' x 6' section. All the setions are bolted together and can be separated. The new arrangement allows for a 48" wide aisle in the center of the plan. The entire Average Eastern mainline can be operated from this area.

Probably the biggest change to the track arrangement is the four track loop. Trains on the current "short" loop appear too often. The only way to lengthen the frequency of their "orbits" is to stop trains somewhere on the mainline in plain site. The "Class 1" mainline on the new plan now runs arond the entire perimeter, about 1 1/2" scale miles. A long freight moving at 15 mph takes over four minutes to make the entire loop. In addition the new loop also includes staging for eight trains, four in each direction. Each track can hold a four unit lashup, forty 40' freight cars and a caboose. This staging yard is open but separated from the rest of the layout by a view block. Finally, a lift gate has been added that spans the aisle and supports four tracks.

The yard and mine at East End are gone, replaced by the AE engine facilities and the two staging yards. Further "east" the interchange track at Average itself has become a small yard. The town is now supported by the 2' x 15' "exstension" that replaces the bookcase. The yard at Owertown still serves as the sorting yard for Quotidian and rests on a 4' x 8' section of benchwork. Quotidian has some changes to the track arrangement. Including the four track loop meant changing some of the industrial sidings.
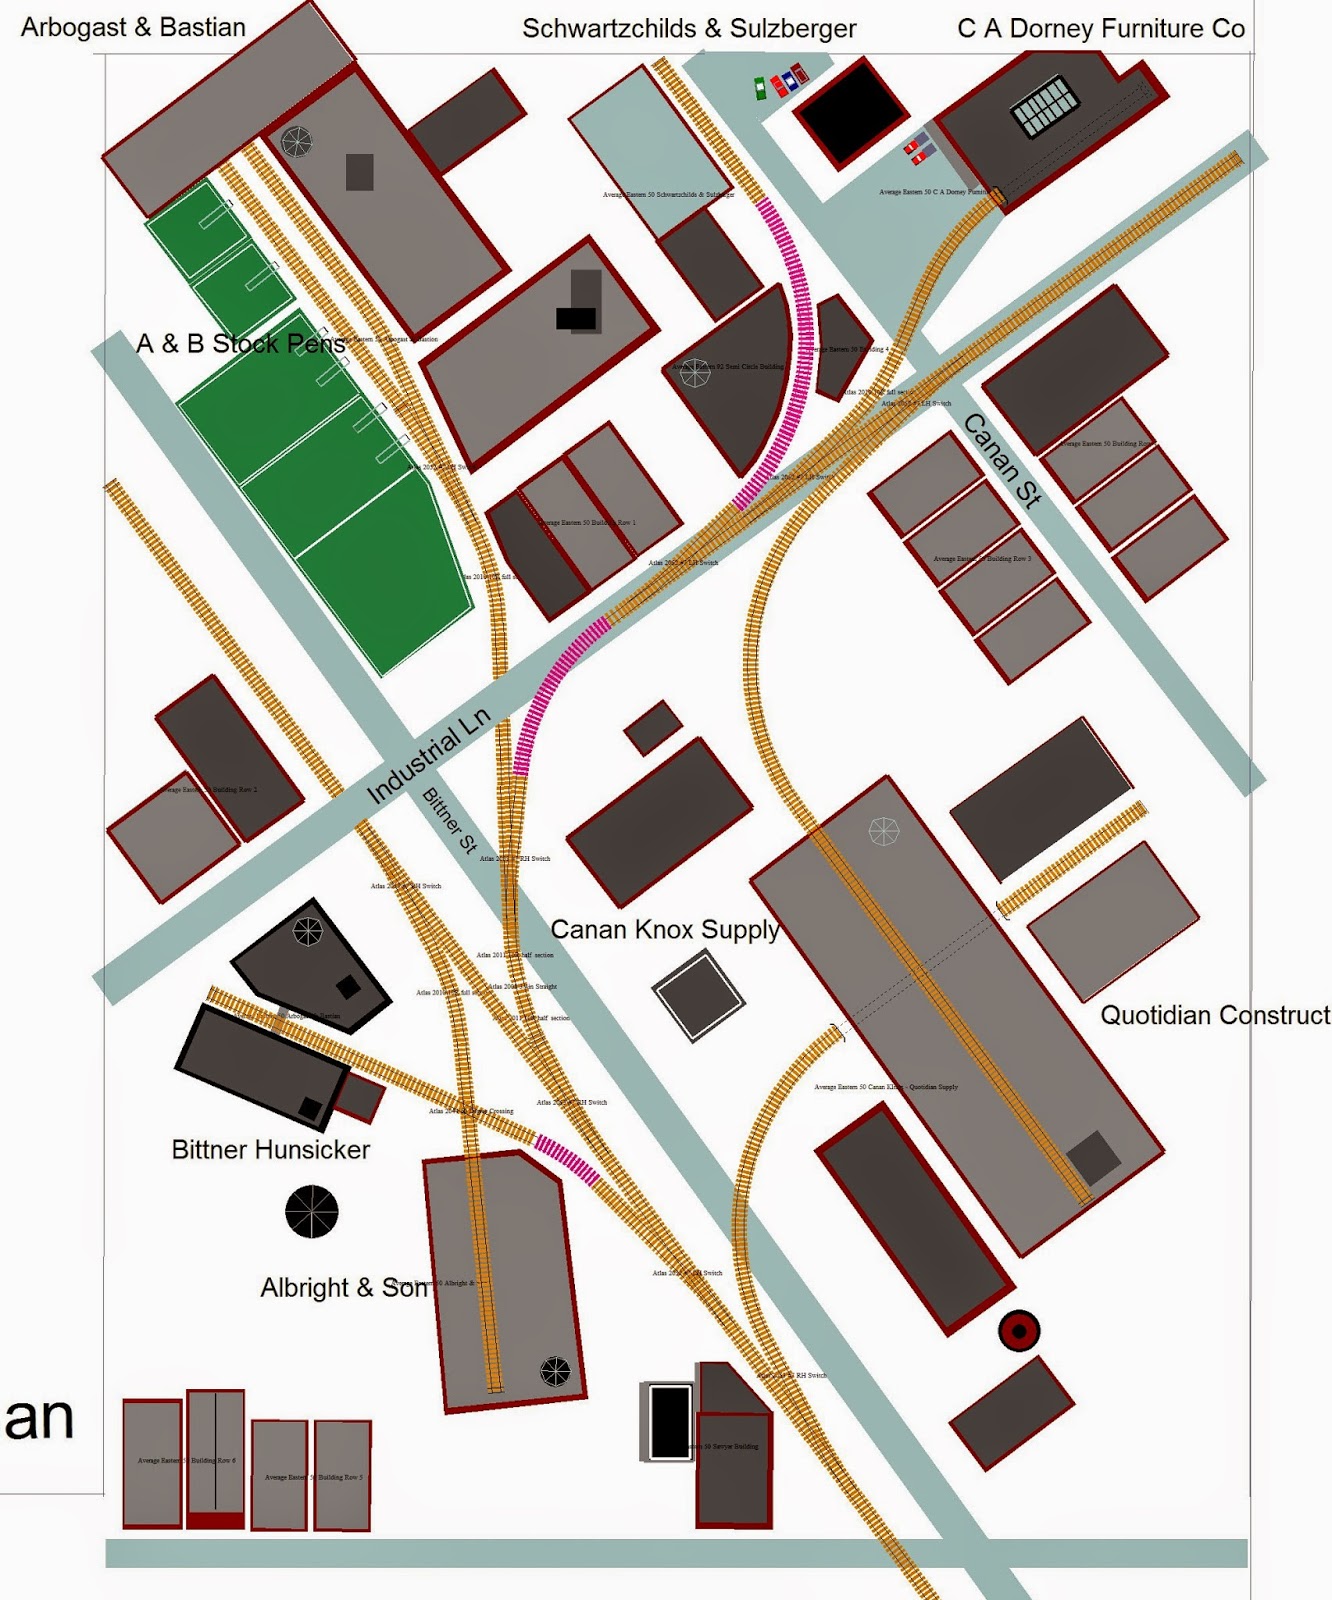
Track Plan: Current Quotidian
Track Plan: Quotidian Redesigned

While the general track arrangement probably won't change much, it will be modified as the simulations are run and reconstruction begins. I may reduce the interchange yard to add more industries. I wish the AE mainline had a longer run, but that might entail reducing Quotidian or eliminating the staging yards. Not sure, I'm still mucking about.

Regards,
Frank Musick

Building a dream layout on a nightmare budget
The Average Eastern Railroad


Sunday, December 14, 2014

Owertown Transit and Other Things

Going in several directions at once. I'm adding colors to the scenery. I mix Rit dye into the drywall compound rather than using paint...
B&O Sharks Rounding Clark's Summit

CNJ Babyface Along the Split River 

The colors are very subtle in the images so it may be hard to see any difference. Rock faces are gray, balance of scenery is green or tan. "Real" scenic materials like grass, dirt and rock carvings will cover this base. Thinking of cutting down that peak towering above the train.

I'm working on wiring turnouts using sub-mini DPDT switches. I've been doing this at the workbench. The idea is to create an assembly I can drop into place...
Switch Throw Wiring

Switch Throw Support

The turnouts in the photos are Atlas, but most will be hand laid. The plan calls for over 40 so the cost of "store bought" turnouts would be prohibitive.

Freight cars are readily avaible since they can originate from any road. I need more local equipment from the modeled roads. The AE suffers from a dearth of more passenger equipment. The cars on hand are lettered for Illinois Central, AT&SF and Burlington. I stripped most of them so they can be repainted for LV, PRR, B&O etc...
Passenger Equipment

That jug in the background is brake fluid. I've found that on this batch I can leave them soak for days without damaging the plastic. I don't warm it up as some suggest. The fluid has been reused over and over and over.

I got a chance to paint some equipment for the Owertown Traction Co. The "expansive" roster includes a PCC car and a Transit bus. The PCC is a lowered Bachmann. The bus is one of Brian Federoff's excellent resin models...


O'Town Mockup
Regards,
Frank Musick

Building a dream layout on a nightmare budget
The Average Eastern Railroad