 |
| Allegheny Eastern Plan, 1/25/2012 |
 |
| Interconnections |
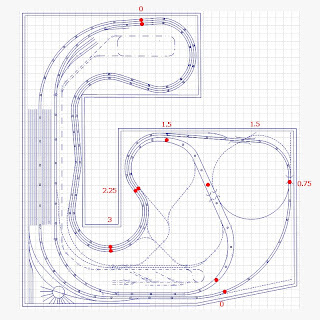
On the right is a detail of the area where the helix would have been located. Instead I have drawn in a series of interconnections.
Red = PRR sidings or secondary track
Purple = Altoona Northern
Blue = Altoona & Logan Valley
Green = Glenwhite Coal & Lumber Co.
Brown = Kittanning Run Railroad
The three PRR sidings into the area include two tracks that ran to coke ovens back in the day. Both are located around Gallitzin. The third siding runs to the A&LV power house in East Altoona. Notice that the Altoona Northern and A&LV tracks interchange. Although I could find no evidence that this actually happened, I bent the rules a tad. The interchange will provide an excuse to run boxcab motors and freight under the wire. The Altoona Northern / Glenwhite loop remains pretty much the same except for the introduction of a small yard / passing siding. I drew a second Glenwhite connection that once existed (the wye at "milepost" 22) and also show the connection for the Kittaning Run Railroad (abandoned about 1914) on the east side of Horseshoe Curve. To include these two connections requires that most of the other tracks be elevated to about 1.5" to keep the grades to a minimum. I don't mind elevating the area as I think it would create some scenic interest, but I think the extra connections at The Curve might be two too many.
So much for reviewing the plans. Time to show some video of the "new and improved" Allegheny Eastern in action. The video follows the mainline west from East Altoona to Gallitzin. Please forgive the quality of the video, I'm still learning to use the camera...
In the first segment we catch a pair of eastbound BF16 sharks as they pass the engine terminal at East Altoona on Track 1 A westbound freight blasts by on Track 3. The mainline splits in two at this point as it passes through and around the yard. Next, a Shay pushes a pair of empty hoppers to the Altoona Northern / PRR interchange at Juniata. Our cameraman switches to an aerial view to get a wider angle on freight action at Juniata with Kittanning visible in the foreground. Then we're looking west towards the area of Altoona Station where the mains come back together after passing the yard.. Following the westbound freight to Wikes we catch three freights rounding the curve as an eastbound passenger passes on Track 2. Then the camera moves to The Curve, looking east towards Kittanning as several freights make their way past Kittanning Point in both directions. Giant Tape Measure will be replaced by K4s #1361 in 1957, about eight years from now. A little farther west the camera catches the Glenwhite Shay dropping off two loaded gondolas at Kittaning Point as the Great Wreath hangs in the sky. An aerial view of Burgoon Run shows the Glenwhite Shay idling on the siding as two eastbound freights rumble by. The scene switches to McCains Curve looking towards Horseshoe as an L1s barrels west on Track 3. A second westbound, hauled by an AS16m follows on Track 4 while a short eastbound passenger train drifts down track 3 towards Altoona. At Bennington a K4s holds on the New Portage branch while westbound traffic passes on the main. Eastbound traffic can be seen heading downgrade in the background. A wider view shows the arrangement of tracks approaching the tunnels and a load of empties heading east. The camera drops down so we can watch the train cross the New Portage bridge. A wider view of trains entering and exiting the three tunnels. That westbound local from Hollidaysburg will take the westbouund main once the controller as SF tower gives the go ahead. We are on the top side of Tunnel Hill now as a westbound freight exits the west portal of Allegheny Tunnel. A second westbound follows soon after thru Gallitzin Tunnel. Finally, some shots Altoona & Logan Valley cars passing on 10th Avenue and a look at the 3" radius loop at 17th Street. The final scenes show how well the Bachmann PCCs can run on such a tight curve, including a few seconds of open throttle. I never suspected they could negotiate these curves at high speeds! I usually run the trolley's at a more sedate pace..

No comments:
Post a Comment