Thursday, January 3, 2013

Minutiae

Building a model railroad like the Allegheny Eastern isn't just about hammers, saws and flex track. It's about railroads and history. One of my favorite areas is the research on these subjects in general and the Pennsylvania Railroad in particular. This research is tedious to some, but for someone who likes to read (me for instance) it can actually be "fun" (of sorts). It requires reading a great many things on a variety of subjects. a kind of cross discipline study that fits in well with a "jack of all trades" hobby

The research focuses on railroads, of course, but because I am setting the layout in a certain time period I also have to look at what was going on in the world in general. I am essentially creating a set for the trains to perform on. There all sorts of tiny details that can be added to make the stage more believable. Way back in the day Frank Ellison, a model railroad pioneer who created Delta Lines, wrote a series of articles called "The Art of Model Railroading". He stressed this "actors on a stage" approach to the hobby. This was at a time when most model railroads were little more than a card table and an oval of track.
Delta Lines Boxcar
Case in point, suppose I want to model a theater in downtown Keystone. It helps to know what movies should be listed on the marquee. What films were running in local theaters in the late 1940's?
Bogart and Bacall "Key Largo"
There were Bogart films like "Key Largo" and "The Treasure of Sierra Madre". John Wayne was starring in the "Three Godfathers". Other films my N scale townspeople might want to see include "Johnny Belinda", "The Boy With Green Hair", "Abbot and Costello Meet Frankenstein" and Laurence Olivier in "Hamlet". There were quite a few others. Putting one of those titles on the outside adds a sense of where and when to the place.

In 1948 Harry S. Truman was running for re-election against Thomas E. Dewey. That was the year when the morning papers proclaimed "Dewey Defeats Truman". Advertisements and billboards would have displayed campaign slogans for both parties hoping to gain a few more votes.
Truman Re-Elected Despite the Chicago Tribune
In the streets of the N scale city of Keystone there should be men wearing suits and ties. They wore a suit for work. They also wore them when going out. It didn't matter if it was a date, dinner or a movie.
 Guys Wear for 1948
Blue collar workers could be found in less formal attire in their daily jobs. Some, like railroaders might wear some sort of overall. Very few, if any, adult males wore blue jeans like we wear today. Their work clothes looked pretty much the same as their suits but without the tie and jacket. Almost all men wore a hat out of doors, taking them off in church, the office or at home.

Women and girls wore skirts or dresses, even around the house. It was the way things were done.
Sears Catalog 1948 
Teenagers in that time dressed pretty much the same as their parents. The casual look was for actually being casual. Even then it was pretty dressy by today's standards.

The cars and trucks in the streets also need to reflect the period. In searching catalogs for N scale vehicles I find that I can use more of what's available than I thought. Chevy and Ford trucks looked the same from the late 40's into the early 50's. The 1950 Chevy Fleetline sedan looks pretty much the same as the the 1949. Same with the 1949-1950 Ford. A lot of the cars on the street were older models, most working stiffs had second hand automobiles. Cars from the early 40's were common and because of the war used pretty much the same body style throughout that decade.
Traffic in 1948
For trucks I can use the older vehicles for the same reason. They stayed the same year after year. The cab-over White looked the same from 1948 to 1953. So did the cab over trucks made by GMC. The International R series that's used on just about every transition era layout appeared in 1950, a little late to be cruising the streets of Keystone. The earlier models looked more like a 1940-41 Ford. The Chevy and GMC small trucks used the same body style between 1948 and 1954..
1948 Chevy Pickup
1954 Chevy pickup

There are an endless number of small details that can be added to set the stage for any model railroad. Plenty of material can be found in old newspapers, magazines, websites. Google Books is a great place to look. You can find old issues of Look, Popular Science and several other magazines. I even search E-Bay for old pictures, postcards and magazine ads.

Regards,
Frank Musick
Chief Cook and Bottle Washer


Allegheny Eastern Railroad


Wednesday, January 2, 2013

Punch List

In the construction industry, as well as a few other trades, there is a thing called a punch list. You may have created one if you've ever bought a new house. You walk through the structure with the contractor and make a list of all the things that are not done correctly or missing altogether.

This is the punch list for the Allegheny Eastern, at least so far. The test trains running on track 4 revealed quite a few "kinks" to be ironed out.

The Helix:
Bad rail joints with misaligned rails that cause sharp bends in the track.
Straight sections in what are supposed to be continuous curves. The transitions in such areas forms a curve that is less than the minimum radius. Track 4 was so bad we rerouted the trains over track 3 so they would derail less...
Badly Aligned Joint
Bad Joints and "Straight" Curves
A new helix is being constructed with channels that will keep the curves at a specific radius. The track will be relaid after all the joints have been aligned properly and soldered together. I was warned about this and ignored the advice. After going through several articles in my magazine library I also learned that the track should be laid straight while the joints are done correctly. After the the joints are aligned and soldered properly the track can then be laid as a curve.


Wavy Roadbed:
When I elevated the roadbed I thought I was carefully lining up the grade. I measured the distance from the bottom of the roadbed to the benchwork and then cut a piece of 2" x 4" upright. What I should have done was used a 1" x 4" and made the support adjustable. That way I could move the roadbed up or down to make sure the grade was one long smooth climb and not a series of shallower and steeper grades. It was actually easier to get a smooth grade on the helix...
Waves in the Grade
Waves Through Kittanning Curve

Smoother Trackwork:
While I did a pretty good job of getting the track down, there were a few places that could have been better. One such area is the curve in the passenger mains at the west end of the yard. Rather than follow the center lines on the plan, I should have made the curve more sweeping and eliminated the short straight section. It just doesn't "flow" right, if you know what I mean. Another area I'm not happy with is the approach to what is now called Kittanning Curve. By following the plan I ended up with a kind of flat curve that just doesn't look, well, "railroady". I believe a broad reverse curve here would look a lot better, more like a real railroad snaking its way up a mountain side...
Flattened Curve at Keystone
Not Curvy Enough!


Not everything was a wash. The mains through the yard are almost dead straight, just as they should be. The long straight edge I used really helped. In a couple of places. like the area through Blair, the parallel tracks were not so straight and will need some rework...
Straight Mains through Llyswen Yard
Not So Parallel at Blair


Superelevation: 
This has to be redone. It's just too much. I used 1/32" thick strip of wood at the outer end of the rails. This is about 1mm. It should be more like 1/64". My 2-10-0 stalled here and just plain tipped over.
Not So Super Elevation


There are probably a myriad of other issues, but that's enough to keep me busy for a while.

Regards,
Frank Musick
Chief Cook and Bottle Washer


Allegheny Eastern Railroad

Tuesday, January 1, 2013

Various and Sundry

The present version of the Allegheny Eastern Railroad is the culmination of several years of planning. The track plan was worked out over months of trials, most of them involving the creation of an actual model railroad in our two car garage. The design process was what they call organic design, meaning I had to actually build something in order to properly visualize it. Eventually, the idea took form in my mind and I was able to express it as a plan. Most people in this hobby start with a plan and end with a model. I did it, as the saying goes, bass ackwards.

The layout occupies a 15' x 15' space in a garage that is roughly 20' square. The track plan is essentially a closed loop consisting of four tracks. The "ruling grade" is the 2% uphill climb between THORN tower and Tunnel Hill. The grade, which represents the east slope of the Allegheny Mountains, is over 30 feet long (over a mile in N scale) with the summit almost 9" above the rest of the layout (about 52" above the garage floor). To return from the top of the grade at Tunnel Hill to Harrowgate I use a four track helix. The helix includes another 30 feet or so of track and also has a 2% grade.
Although the layout depicts the area of Pennsylvania that surrounds PRR's "famous" Horseshoe Curve, railfans and modelers alike will readily notice I have changed all the place names. In my freelanced version I used names that suggested you are in Pennsylvania. Many of them are actually named after places or things  in the area being modeled. Some of them are fabricated or borrowed from other places that struck my fancy.   The city of Keystone, for instance, is named for the logo of the PRR and Pennsylvania's moniker "the keystone state". Harrowgate is actually a section of Philadelphia know for their string band in the annual Mummers Parade, a long standing tradition in Philly. Remington and THORN were the first things that came to my head.

The Allegheny Eastern also borrows standards and paint schemes from the PRR. Signals along the tracks will be modeled after the Pennsy's white position light type. The locomotives will be painted in the Pennsy's DGLE (Dark Green Locomotive Enamel) sometimes referred to as "brunswick green". The Allegheny Eastern logo is borrowed directly from the Pennsylvania Railroad...
Allegheny Eastern

Pennsylvania Railroad
The colors and lettering for all cab unit diesels was also borrowed from the PRR, specifically a scheme only used on certain Baldwin "sharknose" units...

Some steam engines also bear this lettering scheme, similar to the way the Pennsy lettered its T1 class of duplex locomotives. Switchers, road switchers and most steam units display only the words ALLEGHENY EASTERN on their hoods or tenders. I also use a classification system for diesels based on the Pennsylvania's system of the late 1940's. In that short period, road locomotives were purchased in sets and the Pennsy classed them that way. A three unit set of Alco PA's, for instance, was designated as AP3. The A designates the builder American Locomotive Company. The P signifies the locomotive is assigned to passenger service. The 3 is the number of units. There was sort of a rhyme and reason to this scheme. All passenger trains were thought to require 6000 HP on the front end. The prime mover in an Alco PA produces 2000 HP. Since the units were to run as a single A-B-A consist the total output of the three units met this requirement. Freight locomotives were classified in a similar way. Switchers and road switchers were always classed as single units.

So much for the various and sundry fundamentals. In upcoming posts, I'll get into the actual construction of the layout itself.

Regards,
Frank Musick
Chief Cook and Bottle Washer
Allegheny Eastern Railroad


Tabula Rasa

If I remember my high school Latin correctly "tabula rasa" transliterates to "blank page" as in clean start. So it is with this blog. There was an earlier version, but it disappeared completely as a result of a poor choice on my part. No matter, it's sometimes a good thing when one has to start over.

This blog is about my hobby, model railroading. Specifically it is about the construction of my current model layout, dubbed "The Allegheny Eastern Railroad". Like this blog, the Allegheny Eastern is making a clean start. Previous versions were more design exercises than actual layouts. I had to learn how to design and build a large model railroad. I have been doing this by trial and error over the past few years, building and rebuilding, learning from each incarnation of the design. Some folks may view it as an idiotic way of pursuing the hobby, but it has it advantages. For one, I did not build a series of completed model railroads. I only constructed enough of the layout to discover whether it would work or not. If it didn't, I would change it. In some cases that meant starting over from scratch.

There were several design criteria for the "All East". One it had to be high enough to provide storage space underneath. The height was determined by stacking three of my wife's Rubbermaid storage boxes. Second, it had to be one level. I had experimented with multiple levels on an earlier version, but wasn't enthused about the idea. While it would appear to provide a longer mainline run, it limited the location of the layout to the walls. While this is the accepted norm for model railroads, I prefer the island design. By designing the layout with aisles and keeping the width to a minimum of 24" I was able to use both sides of the available benchwork, effectively doubling the mainline. Third, the layout would be freelance. In model railroading terms this means the railroad is "made up" and not necessarily a miniature replica of a real railroad. Fourth, the time period for the layout would be set in the late 1940's when steam locomotives were still the primary motive power for railroading. The last generation of steam locomotion was contending for supremacy of the rails with the first generation of diesel electric engines. Within a decade, the sun would set on the American steam locomotive. Most would be cut up for scrap, leaving the survivors as little more than curiosities from an earlier age.

Even though the Allegheny Eastern is a freelance model railroad, it is inspired by a particular place and time. I chose to represent an area of the Pennsylvania Railroad.between mileposts 230 and 250. This is the twenty miles of the PRR mainline that includes Altoona, Horseshoe Curve and Gallitzin. It's where the Pennsy battles it's way up the east slope of the Allegheny Mountains, using imaginative engineering and helper locomotives. This would be the operational theme of the layout. For the most part the motive power, rolling stock and structures would follow Pennsy standards. Because it is freelance, however, I can introduce elements of my other model railroad interests. I can, for instance, use locomotives and other equipment that were never part of the Pennsylvania roster.

Why base the All East on the Pennsylvania Railroad? Having been raised in Northeast Philadelphia, the PRR was an overwhelming presence. The Pennsy's Bustleton branch ran near my home. It connected to the four track Pennsylvania mainline at Holmesburg. The electrified four track main left a definite impression as GG1 and E44 electrics thundered past heading towards New York or Washington D.C. The only diesels I was exposed to were Baldwin and EMD switchers. I was an adult before I encountered to my first road diesel and that was long after the PRR was just a memory.

Read along with me as I create an N scale representation of mountain railroading Pennsy style.

Regards,
Frank Musick
Chief Cook and Bottle Washer,


Allegheny Eastern Railroad


Monday, February 6, 2012

Then & Now

Bennington, January 5th
 In the last few days the Allegheny Eastern has experienced major upheaval. The photo to the left was taken on January 5th. This is the east side of Tunnel Hill, near Bennington. The New Portage branch and westbound mains are at table top level. The eastbound mains are elevated 1 1/2" and the New Portage bridge carries them over the branch. The tunnels are in place. The twin bores are sitting on the table top and the New Portage tunnel has been raised to match the elevation of those tracks. All in all it's pretty flat for the top of The Hill.


Bennington, February 6th
In contrast, this photo of the same area was taken today. All of the mains have been elevated. The westbound mains are now sitting 1 1/2" higher at the tunnels. The eastbound mains are still 1 1/2" at the bridge, but now run uphill to the 3" elevation at the apex of Horseshoe Curve. All the track has been realigned further "south" leaving a large area "north" of the New Portage bridge. The spline roadbed seen here has been recycled for the most part, only the section running east to Horseshoe is new. The splines are not only reusable, they are also still flexible and can be bent to a new radius when needed.


Horseshoe, January 5th
To the right is a photo of Horseshoe Curve as it looked on January 5th. Once again everything is laying directly on the table top, elevation 0" (more or less). The curve is pretty much centered on the aisle. The eastbound mains have dropped back to 0" after climbing to 1 1/2" at New Portage. The mainline from here all the way around to Antis (behind the glue bottles) is dead flat. The only thing on the entire layout that breaks up that flatness is the eastbound grade over the New Portage bridge.

You can see that there are not many opportunities for scenery in what is supposed to be mountainous territory.


Horseshoe, February 6th
This is no longer true. The photo on the right was also taken today and shows the elevated right of way running through Horseshoe Curve.

Sunday, February 5, 2012

Styrosplines, Part 2


Because of design constraints on the Allegheny Eastern I did not use the open frame benchwork suggested by many other modelers. The number 1 design parameter was set by my wife. There had to be plenty of storage space under the layout. This required a flat frame. I set the height to about 51” based on the height of three Rubbermaid containers stacked atop each other. I then built several frames with legs (and wheels) using 2” x 4” pine studs fastened with drywall screws. The subtop is a grid of 2” x 4” studs spaced about a foot apart. I then covered the grid with ¼” underlayment and ½” extruded foam sheathing. The end result was a HUGE table top that fills most of our two car garage.

Unfortunately such a flat table top can cause some distinct issues for a model railroad. There no real way to model scenery below the track without cutting into the 2”x 4” frame. To get scenery below track level, you need some way to raise the track. After experimenting with more than a few ideas, I decided to use spline roadbed. Typically spline roadbed is a lot of carpentry work. I accidently discovered the technique I’m using and thought other modelers might be able to use it. I create my roadbed from cheap extruded styrofoam sheathing sold in many home remodeling stores.
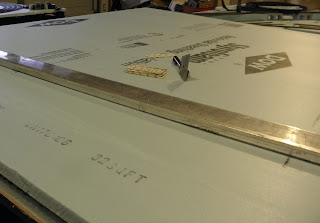
Tools

This picture shows all of the tools required to make spline roadbed out of extruded styrofoam panels. I use a single edge razor blade like the kind used in utility knives. They can be found everywhere. The other tool may be a little harder to come by. It's an 8 foot long aluminum straight edge I purchased years ago for home remodeling. An 8 foot drywall square would work just as well. I'm making my splines 8 feet long, but you can also work with shorter lengths. The trick is figuring out the height at each end of the spline based on the grade you are creating. To create the grade between SLOPE and Horseshoe I’m going for a rise of 3” over 20 feet. That’s about a 1.25% climb. According to my math that works out to 3 pieces of Styrofoam for each spline.
One (1) 96” long rising from 0” to 1.25”
One (1) 96” long rising from 1.25” to 2.5”
One (1) 48” long  rising from 2.5” to 3”

Marking the Cuts
Using ½ ” material I need two of these spline “sets” for each track on the four track main, eight in all. Keep in mind that this is only for the climb out of Altoona, about a third of the 70 foot mainline. Another set will be required to complete the elevation of the mainline through Gallitzin.

I’m starting in the middle creating the spline that runs from 1.25” to 2.5”. I measure the splines in pairs. The dimensions are transposed at each end allowing me to make two splines from a rectangular chunk of the styrofoam.  I then cut along the straightedge with the razorblade. Rather than try to cut in one pass, I make several shallow cuts. I then snap the pieces apart at the cuts.
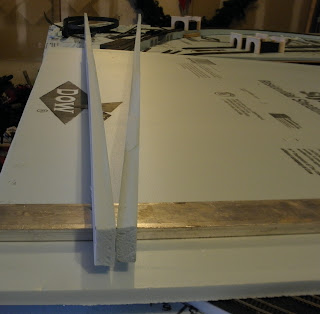


Splines

 The result is two splines of “almost” the same dimensions as shown here. I say Almost because my current cutting technique doesn’t create two identical pieces. They are close enough however, that only a slight amount of trimming is necessary to make them match.
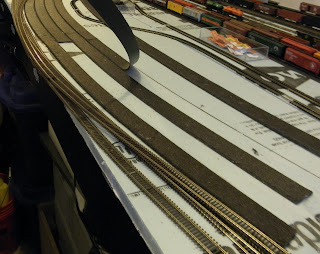
Pulling Up the Track

For various reasons I built the Allegheny Eastern in stages, usually marked by a visit from my grandchildren. Each phase is complete enough that trains can be run over the entire mainline. Once the kids are gone, the next phase of construction begins. In this case the “next phase” is elevating and realigning the mainline between SLOPE tower in Altoona and Gallitzin Road in Gallitzin. 


Before I can install the new roadbed I have to remove the old. The track is held down using track nails which can be quickly removed. The track can then be laid off to the side. The “roadbed”, which is really just ballast strip glued to the foam table top, is pulled up next. Tacky glue was used to fasten the ballast strip. It holds firmly in place until you want to remove it. Pulling it up is just a matter of carefully lifting the strip so it doesn't get caught and tear. It comes up easy and can be reused on the new roadbed. Tacky glue is pretty amazing stuff!
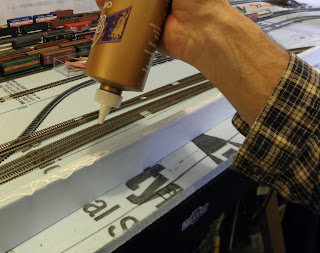


Applying Tacky Glue
Once the track is pulled up and set to the side I start installing the splines, in this case the first piece of the middle set. I apply tacky glue to the bottom of the spline and then put it in place on the layout. I then move the spline back and forth a bit to smear the glue between the spline and the foam table top.

I lay the entire section in one operation and then adjust accordingly, preferring to use a freehand method of laying the curves. I try to allow the natural flex of the spline to dictate the flow of the curve. I can form it into tighter curves if needed. Since, however, all the curves on the layout are broad by N scale standards this is usually not necessary.

Drywall Screw "Clamps"

To keep the spline in place while the glue sets I was using all kinds of weights and other paraphanalia until I hit upon the idea of pushing 3” drywall screws into the foam table top. Like the track nails I use, they hold firmly in the foam. Strongly enough in fact to act as clamps while I lay up the next section or let the glue dry.

The tacky glue creates a strong flexible bond that can withstand to movement of N scale equipment. I'm convinced that with N scale at least, heavy construction materials are not required. I use 2x4s for the bench work out of cost concerns rather than strength. I'm not building kitchen cabinets here and cannot justify the extra expense.

McGarvey's Curve

Looking down on McGarvey’s Curve you can see the kind of “sweeper”created by allowing the spline to form a natural curve. Can’t tell you the specific radius, I lay these out by eye rather than dimensions. I think I end up with track that appears to flow like the prototype does. Because the radius is not set the splines tend to bend tighter towards the apex or center. The resulting curves appear to widen at each end, giving the impression of an easement. When large steam engines were common, railway engineers had to include easements as a way to funnel those long rigid wheel bases into curves.


Gluing the Second Spline

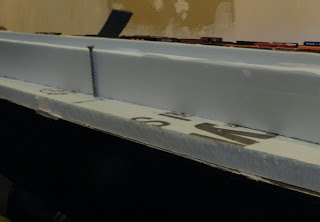
The second section is installed by applying tacky glue to one side and the bottom. The new spline follows the first in direction and curvature. The two are glued to each other and the table top, creating a strong base for the track. You can also see that now there will be room below track level for quite a bit of scenery. 1" is about 13.5 feet in N scale, so this area will be almost 33.5 feet above the table top. At Horseshoe Curve the elevation will be about 47 feet above Altoona Reservoir. Granted this may not be the kind of construction you might use in modeling the Western Pacific, but it works well enough for Pennsylvania. Of course you could always use taller splines, but on the Allegheny Eastern that would require elevating all of the track. Hmmm...I wonder...Better not go there
Second Spline in Position

With the second spline in place the “almost identical” dimensions are quite obvious. That straightedge I use isn't always straight (its actually two four foot sections that slide into each other) and this is the result. Not to worry, however, as this can be easily "adjusted". It took me a while to work out the technique, but it is clean and neat...More on that a little further on.

That's another advantage to some of the materials and techniques I use. I don't need power saws or sanders to create most of this stuff. Did you know you can cut 5mm plywood underlayment with a utility knife?

Second Spline, McGarvey's Curve

 Looking back towards McGarvey’s Curve you can see that the second section lies directly alongside the first and creates a smooth flowing curve. I have built the corner out to support the new right of way. It uses very little of the aisle space at this point while creating gobs of space on the layout. Eventually the entire "fascia" will be extended about an 1 ½” into the aisles. This will get some of the trackwork away from the edge and little fingers that sometimes get too close to these tiny models.

In this view you can see how much space now exists between the new right of way and the trolley line in the background.

Trimming

Once the second spline is in place I use the razor blade to trim the two sections to the same height. You can see that I lay the blade on top of the spline and slice away the excess. Previously I had done this with a scraping or filing method and was not pleased with the end result. The top of the roadbed got pretty beat up and although the ballast strip covered it up I wanted something a lot smoother. Slicing with the razor leaves a much cleaner and even surface.


Ballast Strip Installed Track 1

I wouldn’t normally lay the ballast strip at this stage, but I wanted to show how this works. Two sections of ½” thick spline are exactly the same width as the Woodland Scenics ballast strip I use. Even better, when all four tracks are in place they will be spaced on 15' centers, the Pennsy (and Allegheny Eastern) standard. I know other modelers allow more room but on the All East the curves are broad enough to allow prototype spacing. There is very little overhang on the passenger cars and no sideswipes have occurred (as yet) even with the 80 footers.
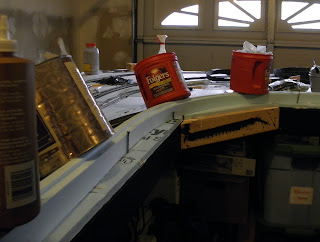
Waiting for the Glue to Set

With two sections in place it’s time to let the glue set. While the drywall screws keep the spline in place horizontally, weight is still needed to hold the spline to the table top. I use coffee cans full of bolts as weights. I usually allow about twenty four hours for the glue to set before continuing to the next section.
The next section can either be the other pieces in the set, thus completing 20 feet of roadbed for that one track, or by adding adjacent sections for the other three tracks. I prefer to complete one track at a time. It’s easier to realign one track with its roadbed than four. I may not mind redoing a thing, but I'd rather not redo that much.


In the next installment we may see Track 1 extended all the way trough Gallitzin. Reusing the  splines from the New Portage grade has given that area a head start.


Saturday, February 4, 2012

"Styrospline"

Allegheny Eastern February 4th, 2012
More doodling led to more ideas on what might be done. The latest update of the track plan shows that the general layout of the mainline remains the same except for the realignment between MP10 and MP25. Horseshoe Curve has been relocated about 10" "north" and the approach to The Curve straightened out to allow more room in Altoona.

The eastbound main between MP45 and MP30 has also been realigned further "south" bring the tunnel bores closer together. This leaves enough open space in Gallitzin for a Hollidaysburg staging yard on the New Portage branch. There's some reworking of the trackage for the Altoona Northern and Altoona & Logan Valley. On the A&LV I made the return loop much larger and placed the carbarn and industry tracks inside.

"Styrospline"
So much for the track plan. Incorporating these changes into the actual layout seems like a bit of work, but again the construction methods used allow for some pretty big changes. One of the techniques I'm using worked out better than I imagined. The styrofoam spline used to create the New Portage grade proved to be a huge asset. At right is a picture of the spline where each section the roadbed was essentially a 1/2" square. The four parts are glued together with tacky glue and are almost inseparable. Not only is the spline super easy to create, the only tools required are a razor blade and straightedge, it's cheap. A 4' x 8' sheet of  1/2" thick foam is less than $15...You can get a lot of spline out of that sheet.

"Old" Roadbed
One advantage I hadn't foreseen was the road bed can  be re-used. It remains flexible! I found that I could reuse the section between MP30 and MP35. In the photo on the left the roadbed is still in it's original location. The New Portage bridges have been moved to their new location towards the center of the picture and the track has been moved to approximate the new alignment. The roadbed between the bridges old location and the camera will need to be removed. I pulled it loose from the table top and realizing how flexible it was just swung it into position along the new alignment.


Flexible Spline
To my surprise it went into place creating a broad curve. If I were going to reuse it in this location all I would need to do is glue it back down and relay the track. Instead I now know it can used elsewhere on the layout, another component that's recyclable. Since I tend to use construction materials over and over this fits in well with the other design and construction methods developed so far. Kind of an "instant" 1.5% grade for two tracks. Makes me wonder if the spline could be made up ahead of time and then "flexed" into alignment. The flex of the material would create natural broad curves. I'm pretty sure the spline would have to be laid down two tracks at a time. A spline for all four tracks would be four inches across and not quite as flexible.


Revised New Portage Area
It didn't take long to layout the modifications to the Tunnel Hill / New Portage section. You can see that the New Portage bore is much closer to the Twin Tunnels and is a better representation of the area being modeled. There is now a great deal of space available for the New Portage branch to actually travel somewhere. Current plans call for a kind of "staging" yard, but other opportunities may develop. The westbound tracks will also be elevated, but only about half the height of the eastbound. The eastbound roadbed to the right of the bridge will run uphill from the 1.5" elevation at the bridge to the 3" maximum at Horseshoe. The westbound main will drop from 3" at Horseshoe to about 1" at the twin tunnels.

McGarveys
As for the other areas being revised the photo on the right shows the new alignment at McGarveys Curve at the lower right hand corner. The faint blank line running between the mainline and the Altoona and Logan Valley tracks is the edge of the old alignment. There is now almost a foot of space available. There needs to be a mountain side in this area and there is now enough room to model one. The benchwork is being extended in this corner with a "triangle" of real estate to support the relocated tracks.


Kittanning, East of Horseshoe
The situation is the same in the opposite direction toward Horseshoe Curve. This shot of the Kittanning area show that the mainline has been moved aside. The short train is on the Altoona Northern interchange track in Juniata. The two areas are now separated horizontally by about 12" and vertically by almost 3". Just like at McGarvey's Curve, there is now enough room for a mountain side. This will be the site of Baker's Run and the Kittanning Run Railroad will connect here.


Burgoon Run, West of Horseshoe
The realignment on the west side of Horseshoe looking east from McCanns. The mainline now sits about 6" further "north". The tracks of the Glenwhite Coal & Lumber Co now turn off up Burgoon Run towards Gallitzin. The elevation at the turnout will be about 2.25" descneding towards the tunnels. The large vacant area without foam will support the Gallitzin sidings and the GC&L connection to the Altoona Northern and A&LV as shown in the updated plan. This is also the location of the "access hatch" to maintain the westbound tracks in Gallitzin.


The new splines will start going in this week. I hope to show some step by step construction photos of the splines being made and installed. Once they are in place the ballast strip can be glued back down and track relaid. For the first time since it's inception years ago, the Allegeheny Eastern may even be ready for real scenery.